Archive for the ‘food/recipes’ Category

tangelo creamsicle

I was going to make a fancy dancy dessert for easter, but I spent too much time looking for the perfect one which left no time for actually making dessert (though I will make this cake some day). Most of the recipes for our easter dinner came out of Suzanne Goin’s fantastic book, Sunday Suppers at Lucques and I found a simple springtime dessert in there too: Tangelo Creamsicles. These are super delicious and you need to make them.  A recipe is pretty much unnecessary, all you do is squeeze some tangelos (which I think are oranges crossed with grapefruits?) and pour them over vanilla ice cream. Tangelo juice is on the sour side so you don’t need too much of it (should be about half as much liquid that’s in a root beer float). When we were pouring the juice over the ice cream my husband and I were pretty skeptical.  I mean, it’s pretty much just orange juice and milk mixed together, which sounds totally disgusting.  But instead it turned out to be more like the best creamsicle ever. We will be eating these until I can’t find tangelos anymore.

peeps

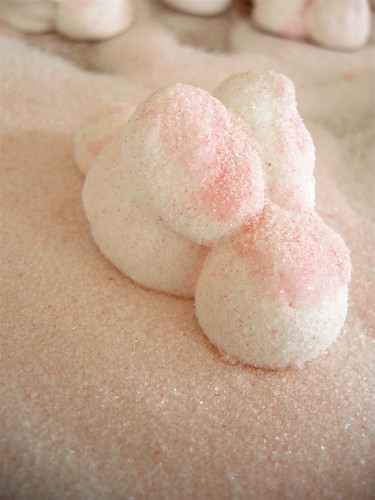
I suppose there are people out there who don’t care for peeps, but I’ve never met them. Most people I know eat them this time of year with abandon and many have their own special way of enjoying them: I like mine stale, for instance (just like my mom), and I had an old boyfriend who liked to burn the little bunnies with his lighter before he ate them–so tough.  But this year instead of buying my peeps, I thought I’d make them. They’re just marshmallows sprinkled with sugar, how hard could it be?  Not hard really, after you royally screw up a couple of batches and have to throw them out, run out of colored sugar (by the second chick), have a small sugar induced meltdown, suck it up and make your own colored sugar (just throw some white sugar and a couple drops of food coloring in a food processor–nothing to freak out about), and come to terms with the fact that every other bunny you make will be a mutant, so no, not hard at all. The most important thing is not to over whip the marshmallows. They should have very soft peaks and can even still be a little warm. I used martha’s marshmallows for piping recipe, which is strangely lacking in the flavor department, so add vanilla extract (or peppermint or licorice or pineapple or whatever your little heart desires), but other than that it was great–and she has piping directions here. Oh and they are freakin delicious, fresh or stale.

I keep forgeting to say thank you for all the congratulations and kind words from all of you about my pregnancy. Thank you so much! It is so wonderful to hear and much needed as I’m freaking out a bit about having three kids under three. Better go eat some more peeps.

snowmen

Yesterday we were buried under almost a foot of snow, so we made meringue snowmen.  I had this little project stored somewhere in the back of my brain for a while and it was the perfect day for it. I whipped up some meringue, piped them onto a sheet pan, and the kids decorated them.  We didn’t have much (and there was no going to the store) so I cut raisins up for the eyes and we used the 10 red hots that were left. I didn’t want to use chocolate chips because I thought they would melt. But now I’m realizing I should have cut up some dried apricots for noses! oh well. I also forgot the peppermint extract, so they don’t really taste like much, but the kids don’t care at all. The meringue is sticky as all get out, so it’s a good idea to wet your fingers a little before you start decorating.

snowman meringues adapted from martha stewart

  • 3 large egg whites
  • 3/4 cup sugar
  • 1/2 teaspoon peppermint extract (or vanilla if you don’t have peppermint)
  • raisins, currants, dried fruit, red hots, or whatever else you have on hand for decorating

directions

  1. Put egg whites and sugar in the bowl of an electric mixer. Set bowl over a pan of simmering water, and stir until sugar has dissolved and mixture is warm to the touch, 2 to 3 minutes.
  2. Transfer bowl to an electric mixer fitted with the whisk attachment. Mix on medium-high speed until stiff peaks form.
  3. Mix in peppermint extract (don’t forget)
  4. Put the meringue into a piping bag with a large tip (or a ziploc bag with a clipped corner, or just use two spoons). If you have a silpat, use it. If not put some parchment paper on a cookie sheet and “glue” the corners down with a dab of meringue. Then pipe three adjoining circles–a snowman, silly.
  5. Decorate and pop in a 175 degree (Fahrenheit) oven for two hours. They will look exactly the same when you take them as they did when you put them in.

This is turning into a tutorial week! Tomorrow I’ll have the directions for the string of lights advent calendar and who knows maybe I can rustle up another tutorial for Friday (but don’t hold your breath). Also, a couple people have emailed me asking whether or not the mobile swap is happening again this year. And yes! it is. Sign up will start in January. Last year it was a big success! And I’ve even got an idea for my mobile already.

how to make english toffee

This is my little bit for holidays at home.

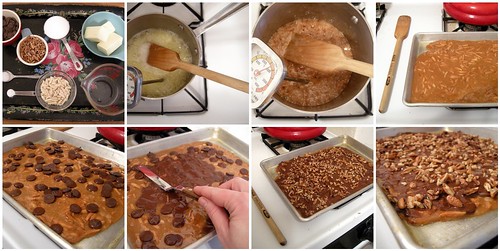
English toffee was the first christmas candy my mom made each year.  After we were done with all the Thanksgiving leftovers, she would make a huge batch and stick it all in the freezer. And I would spend the entire month of December sneaking pieces of it thinking no one would notice. I think probably half was gone by the time Christmas rolled around! So now I make english toffee every year for Christmas and though I still eat my fair share I try to give most of it away.  The recipe below makes a smallish batch–enough for a nice gift or your own personal use–but it is easily doubled or tripled.  Don’t be intimidated by the long (winded) directions, this toffee is easy and quick to make, I just wanted them to be extra clear.

ingredients
2/3 cup butter
1/2 cup sugar
1/3 cup water
1/2 tsp salt
2/3 cup blanched slivered almonds
1/4 tsp baking soda
1/2 cup chocolate chips or 2 small chocolate bars
1/2 cup chopped pecans

you will also need
saucepan
candy thermometer
cookie sheet  (I used a small one, but the size doesn’t really matter)
a silpat if you have one, extra butter if you don’t

directions

Before you jump right in, measure out all your ingredients so they are all ready to go. If you’ve never worked with boiling sugar before (or if you are prone to accidents) keep a small bowl of ice water next to the stove in case you burn yourself. Boiling sugar is super hot, so this isn’t one for the kids. If you have a silpat (and you really should get one–they are awesome) put in on your cookie sheet and you’re good to go. If not, butter your cookie sheet like crazy.

Now that everything is ready, put the sugar, butter, water and salt into your saucepan. Cook over medium heat, stirring occasionally, until it reaches 236 degrees Fahrenheit (soft ball) .  This will take a while and the chocolate chips are not there for you to snack on while you wait. The mixture will bubble up quite a bit.  It will stay around 200 degrees for longer than you think it should, but the temperature will shoot up quickly so don’t walk away. Make sure your candy thermometer is not resting on the bottom of the pan, but taking the temperature of the actual candy.

While you are waiting you can warm up the slivered almonds in the microwave. This will keep the candy’s temperature moving up instead of cooling down when you add them (but if you don’t have a microwave, you can skip it).

When the mixture is 236 degrees add the almonds. Stir constantly until it reaches 290 degrees (soft crack). The candy will turn a lovely amber shade and give off a nice, nutty smell. That when you know it’s done. I might have gone a tad too far with mine, but you’re not going to stop and take pictures while you cook.

Add the baking soda and stir.  Pour onto the prepared pan and spread it as best you can. Sprinkle the chocolate chips on top, wait a minute for them to melt and then spread them all over the top of the toffee. Sprinkle the chopped pecans on top of the chocolate and let cool.  You can speed up the cooling by popping the toffee in the freezer. When it’s completely cool break up into pieces and give away all that you don’t eat.

popcorn balls

One of the nice things about blogs are the amazing tutorials and recipes that people share. One of the crappy things about having a blog is listening to the tutorial writer in your head narrating all the steps while you make something. Of course this only happens when my two toddlers aren’t screaming or banging or just being as loud as they can be for no reason, but when there is quiet that little voice in my head starts writing an informative and witty tutorial for whatever it is I might be doing at the time. So that’s why, out of the blue, I’m going to tell you how to make popcorn balls.

First make popcorn. Normally I hate popcorn, but it is quite a spectacle for the smaller set and we were stuck inside because of the rain.  We had it with tomato soup for lunch and there was a bunch leftover (how do you make just a little popcorn?). The recipe–Betty Crocker–says you should have 7 cups of popcorn to make popcorn balls–I think I had more, it just a big bowl full really. Be sure to pick all the unpopped kernels out or you will break a tooth on one. This is a good thing for kids to do while you deal with the blistering hot candy syrup.

Now put

1 cup sugar
1/3 cup water
1/3 cup corn syrup
1 tsp salt
and
1/4 cup butter

in a sauce pan. If you have a candy thermometer put it in the pan, if not have a small bowl full of ice water next to the stove. Cook the delicious butter and sugar mixture until it hits 250 degrees. This is hard ball stage and the syrup will form a hard ball (duh) when you drop it into the ice water. I broke my candy thermometer, so I had to use the ice water method and I just kept checking throughout.  It will color a little when it’s done and the ball shouldn’t be rock hard, but should give a little under pressure.

When it’s done, take it off the heat right away and add

1 tsp vanilla and
a couple drops of food color if you feel like it

It’s better to have these ready before you start so you don’t forget. Now pour the syrup all over the popcorn stirring quickly. It’s nice to have another person help at this point, but you can manage by yourself just fine. Let it cool a minute or two and make balls. If it’s sticky you can butter your hands a bit and then shape them. Voila! popcorn balls. I always remember these to be a halloween treat. I also remember them being enormous, but I made little ones for little hands. Remember to brush the little teeth when your done!