Archive for the ‘kcwc fall 2012’ Category

kcwc guest post: gail from probably actually

gail from probably actually

I am so excited to have Gail from Probably Actually on the blog today! Gail is an incredible sewer. She has made a closet full of clothes for her daughter and those clothes are impeccably made.  Now that she has a little boy on the way (congratulations, Gail!) we are in store for some classy boy duds! Instead of changing up the Kid Pants pattern, Gail embellished her pants with adorable-ness.  Check it out!

* * * * * * * * * * * * * * * * * * * * * * * * * * * * * * * * * * * * * * * * * * * * * * * * *

Hello! I’m Gail from Probably Actually and I’m crazy excited to be part the pre-KCWC line up! There isn’t much I love more than making kids clothes, and it only gets better during KCWC. As you may have experienced yourself, lugging a sewing machine and serger around town to sew with friends is pretty impractical, so sewing can sometimes feel a bit solitary and anti-social. But for one week in the fall and another in the spring, Meg transforms it into just the opposite with KCWC. Suddenly we’re all on the same page, scheming about kids clothes, sewing together, and sharing our projects in the ever-inspirational Elsie Marley flickr pool. Get ready, it’s so much fun!

Anyway, today I’m here to help kick off this fall’s KCWC and show you how I jazzed up a pair of Dana’s basic Kid Pants!

While there are certainly endless possibilities for changing things up with this pattern, it also yields a great pair of pants without any adjustments at all. The pants are so simple to sew, and I love the flat front option and the wide trouser legs. I didn’t end up making any changes to the pattern itself – I used the size 2/3 downloadable pattern pieces, which worked well for my 3.5 year old (the pattern is made for kids approximately 2 to 3.5 years). There’s plenty of length built into the pattern to make nice wide hems, even when you’re at the farthest end of the pattern range like we were.

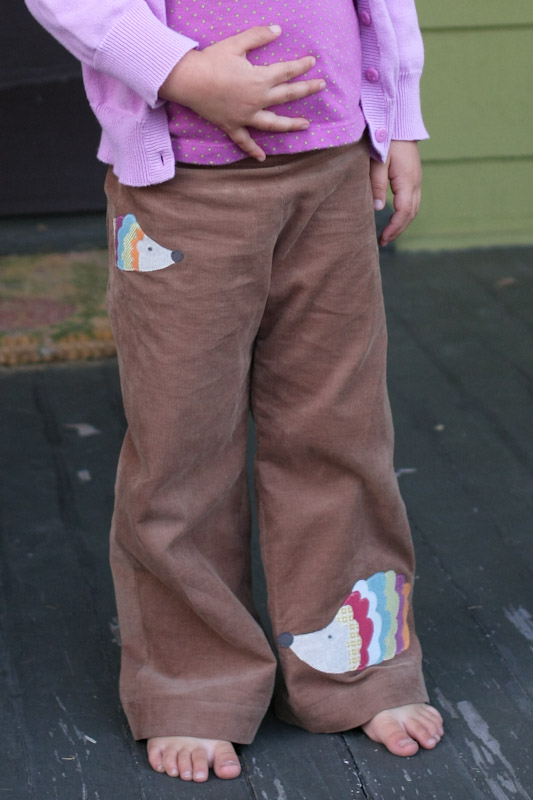
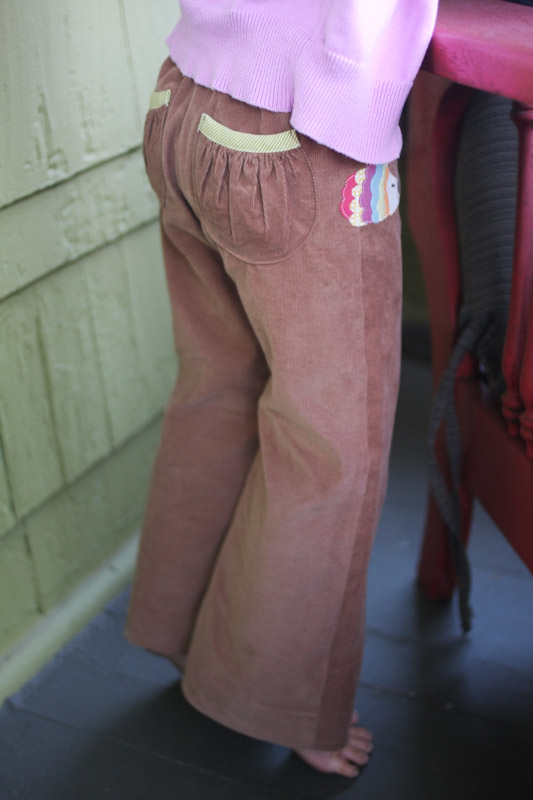
I did add a few things: Gathered pockets to the back, which I borrowed from the Oliver + S Jump Rope dress pattern (view B). Dana has a great tutorial for gathered pockets as well, if you’re looking.

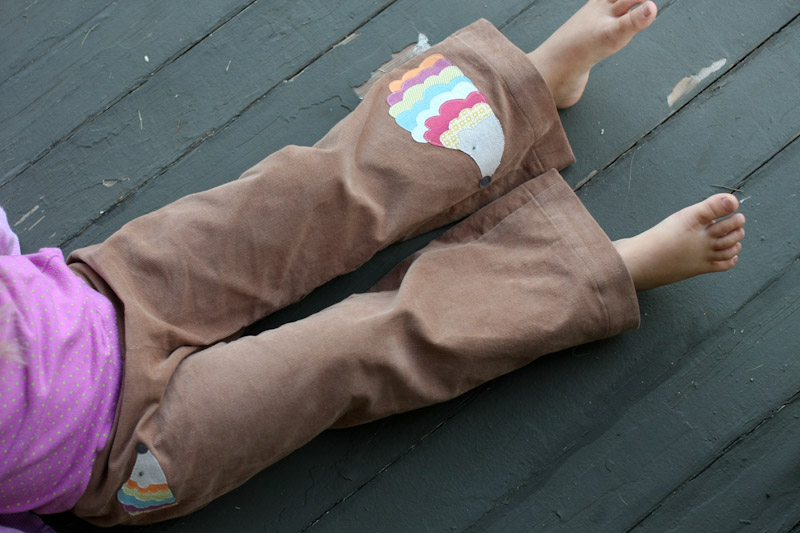
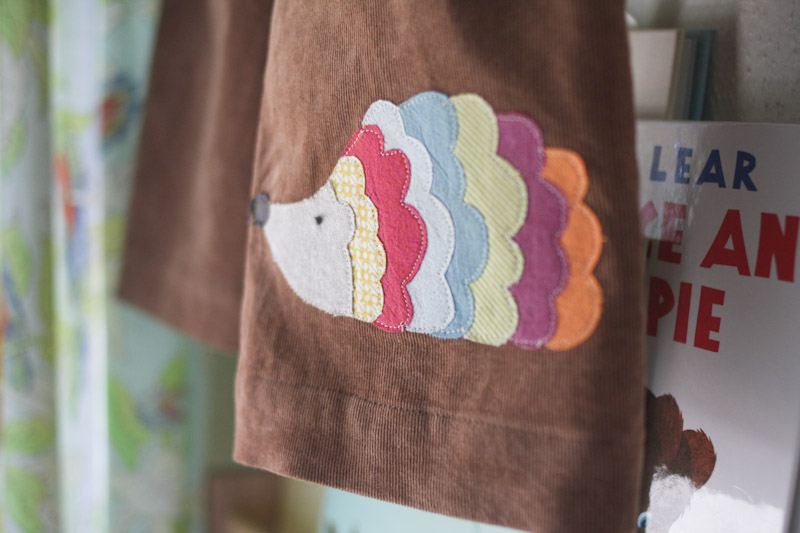
And a couple of hedgehogs to the front – one at the hem,

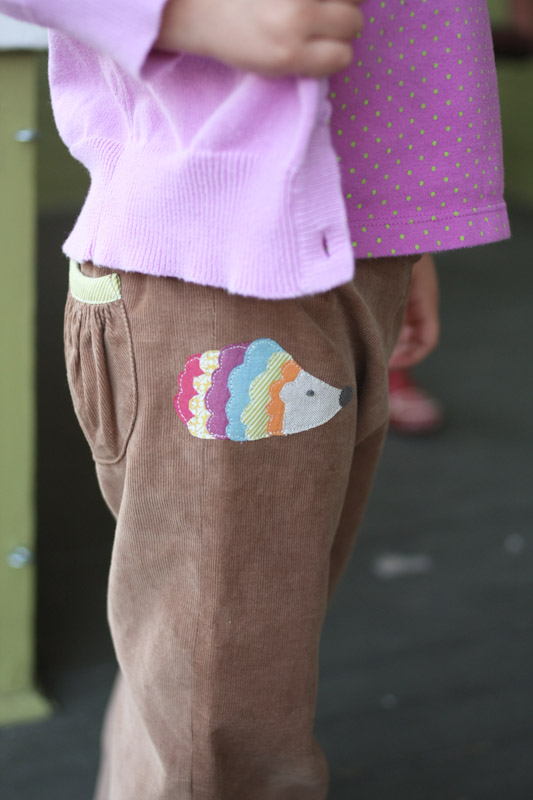
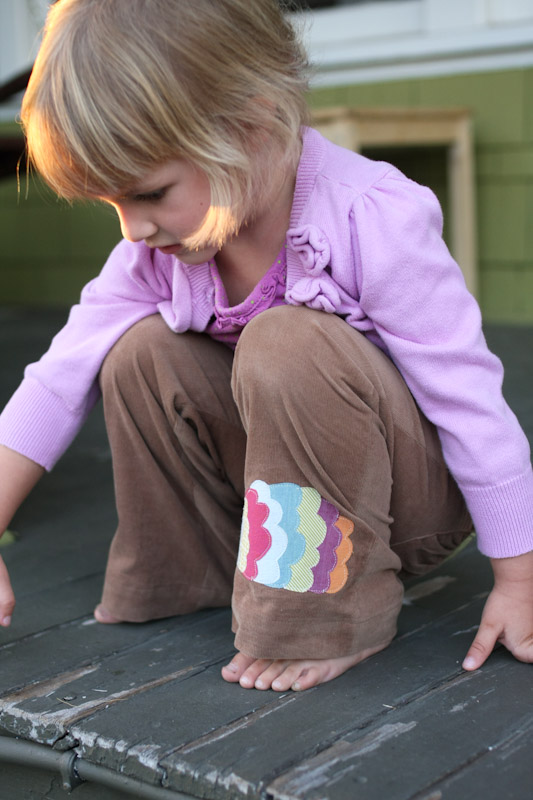
and a mini version wrapping around the side:

Maybe you recognize the hedgehog if you’re a Mini Boden fan – it was inspired by a sweater I saw on their website awhile back. I loved it immediately, and if I were the type who bought $54 sweaters for my three-year-old, I probably would’ve skipped these pants and ordered the original. But yeah, I made my own instead.

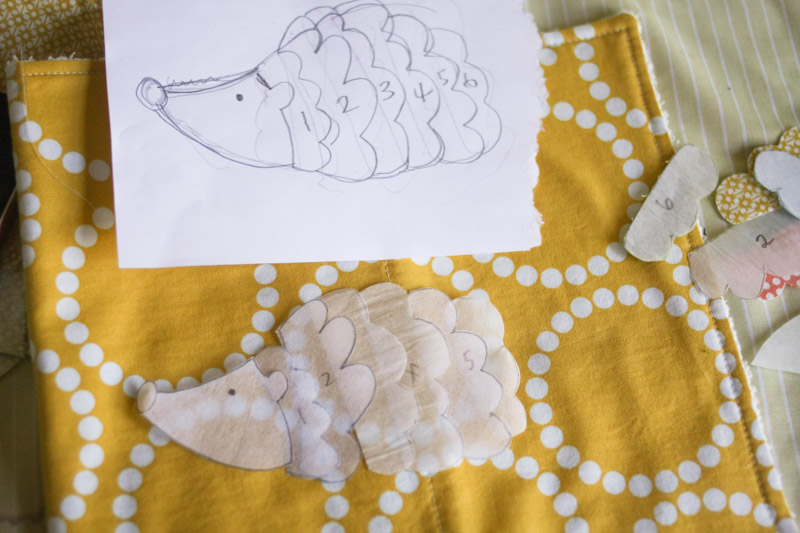
Which wasn’t hard to do at all. I sketched the little critter out, then made eight pattern pieces.

Next, I traced each piece backwards onto Steam-a-Seam double stick fusible web, then laid those onto the wrong side of fabric scraps, cut them out, and pieced everything back together. I finished it off with a french knot for the eye. And voilà – a hedgehog was born!

Sewing around all those little pieces was a bit tedious, and might have been easier to do before the pants were fully constructed rather than after, but I didn’t have that kind of foresight at the time and it still worked out just fine. I just used a very small stitch and picked up the presser foot a lot to shift the fabric as I sewed.

That’s it! Just your basic corduroy pants adorned with woodland creatures. Thanks so, so much for having me, Meg! I can’t wait for KCWC to get rolling next week!!

* * * * * * * * * * * * * * * * * * * * * * * * * * * * * * * * * * * * * * * * * * * * * * * * *
 Thanks, Gail!

kcwc guest post: sophie from cirque du bebe

sophie from cirque du bebe

I’m guessing you already know Sophie from Cirque du Bebe. The clothes she sews for her kids are so stylish and unique they are unforgettable. I mean look at that telephone blazer! Sophie took the Kid Pants pattern and turned it into the comfiest pants in town. She was kind enough to write up a tutorial too!  Lucky you (and me)!

* * * * * * * * * * * * * * * * * * * * * * * * * * * * * * * * * * * * * * * * * * * * * *


Can you believe the next Kids Clothing Week Challenge is just around the corner? It feels like just yesterday I was face first on the sewing nook floor, making pattern angels in the debris and murmuring ‘Just keep sewing…just keep sewing’ to myself. I’m a tad excited to be taking part in the Pre-KCWC celebrations with a cozy, lazy, fall-worthy take on Dana’s toddler / kids pants tutorial. Which happens to have a special place in my stitchy heart as the tutorial behind my first ever (successful) attempt at pants for my then-two-year-old, now four-year-old boy. You’re just going to have to take my word for it that these low ‘n lazy lounge pants you see here started with a) Dana’s pants pattern. And b) a thrift store sweatshirt. If you like low crotches and you cannot lie… this one’s for you!


You’ll need…

  • Ribbing for a wide comfy waistband
  • Elastic wide enough to fill out your waistband (the elastic I’ve used here is 2″ wide)
  • Knit fabric / something fancy to up-cycle like an unloved men’s hoody.
  • Scissors, co-ordinating thread, hand-sewing needle, tracing paper or similar, marker, safety pin.

Did the thrower-outer not see the potential before him?

1) Follow the steps in Dana’s tutorial to produce your own front and back pants pattern pieces.


2) Lay your fabric on the fold and place one of the leg pattern pieces on top so that the point of the crotch sits just over the folded edge of the fabric. To make our low n’ lazy curved crotch, take the marker and draw a curve from the tip of the crotch down the inside of the leg, finishing about an inch inside the edge. Repeat for the other pattern piece.


3) To cut the piece out, start at the bottom, cut to the end of the new line but stop there. Cut the rest of the piece out except for the section above the crotch tip because we want that bit to stay on the fold. Repeat for the other piece. You’ll end up with a front and a back piece that resemble the shape below.


4) With right sides facing sew front and back pieces together at the side seams and the crotch seam with a 3/8 ” seam allowance. Finish the edges or leave them raw. The advantage of dissecting something like a hoody is you can pinch cute features like this pocket, which I’ve attached to the front here. Useful for storing things like cars, raisins etc.


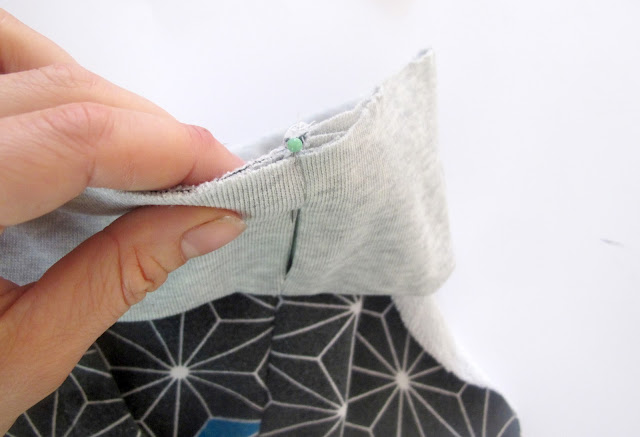
5) To get the dimensions for the ribbing piece, the height here is determined by how wide you’d like your waistband x 2 plus a seam allowance for top and bottom. The length of the ribbing will be the size of your kiddos waist minus 4 “. Once you’ve cut out the piece, fold in half with right sides together like so. Sew together with a 3/8 ” seam allowance leaving a gap of about 1″ in the middle of the top half. Bit of a mouthful.


6) Turn the right way out, fold in half. Does it look like this?


7) Using a fabric marker or a pin, mark the centre point of the ribbing on the opposite side to the ‘gap’.


8) To attach waistband to pants we’re going to line up the raw edge of the ribbing piece with the raw edge of the top of the pants. But most importantly make sure the ‘gap’ is facing the outside and lines up with one of the side seams. Pin this point in place.


9) Find the center point you marked earlier and pin it to the opposite side seam. Once these two points are pinned, it makes it easier to spread the rest out.


10) Pin your layers together feeding the ribbing around the whole perimeter of the pants and stitch with a 3/8 ” seam allowance. Finish the edge or leave it raw.


11) Turn out the right way and press the seam downwards. Starting to take shape!

12) Cut elastic to the length that will be comfy for your child and hook a safety pin through one end. Feed it through the ribbing making sure the other end doesn’t slip through.


13) Secure the ends of the elastic together, using zigzag and going back and forth several times. Stuff it back inside the casing and hand-stitch the opening shut neatly. Lastly, hem your pant legs, or you could even add cuffs. And you’re done!


We’re approaching spring here and while it’s still cool enough in the mornings for knit fabric loungies, they get rolled up into cuffs during the day, which look pretty cute on their own.

* * * * * * * * * * * * * * * * * * * * * * * * * * * * * * * * * * * * * * * * * * * * * *

Thank you so much Sophie!


kcwc guest post: jessica from a little grey

I discovered Jessica, and her blog A Little Grey, when she won Project Run & Play last spring. The clothes she made were super stylish but still wearable, modern but not serious, and cute but not cutesy. Pretty much everything I strive for, but rarely get just right. She is a very talented seamstress who makes amazing kid clothes. (not to mention stunning quilts) And today is no exception. Jessica took the Kid Pants pattern by Dana and turned it into a runway look. Check it out!

* * * * * * * * * * * * * * * * * * * * * * * * * * * * * * * * * * * * * * * * * * * * * * * * * * * * * * * * * * * * * * * * *
Hey, I’m Jessica from A Little Gray, and I’m downright chuffed to be kicking off the pre-KCWC festivities. I love this event so much, but in the spring I didn’t get to participate because I was competing in Project Run & Play. (Which is going on again right now, by the way. Lots of inspiration there.) But this time around, I am all in!

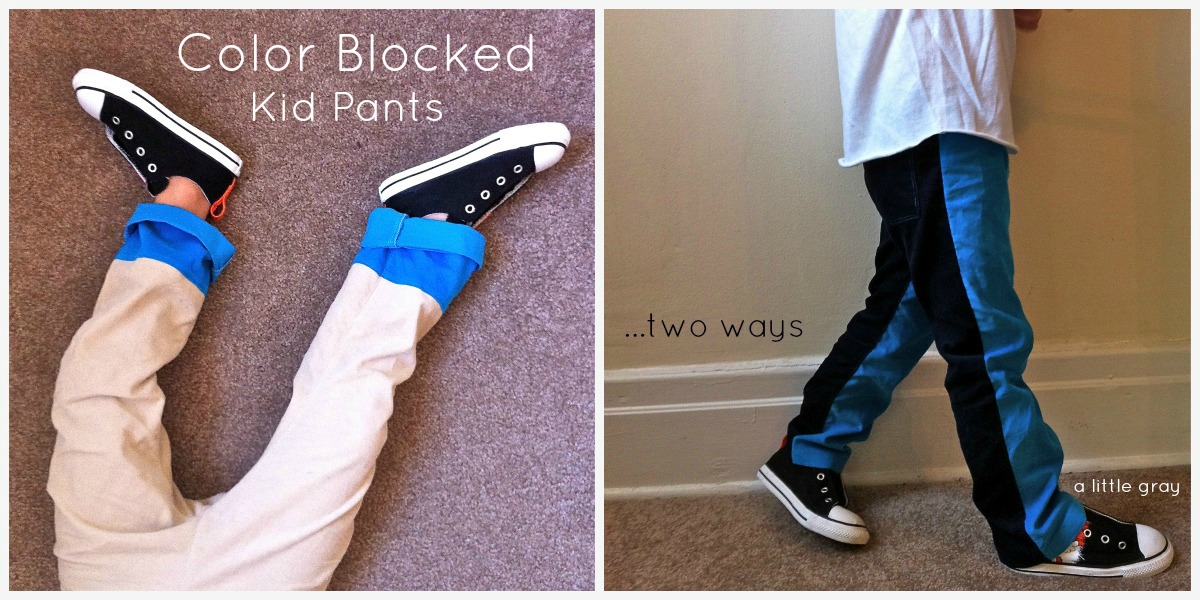
You should know that I love to sew boy clothes. I have a little girl too, but for some reason the boy sewing comes much more naturally to me. Color blocking has been a great trend for a while now, but it seems like girls have been having all the fun with blocked skirts and dresses. When I saw this new collection from Michael Kors, I knew my 3 year old needed to rock some color blocked pants.


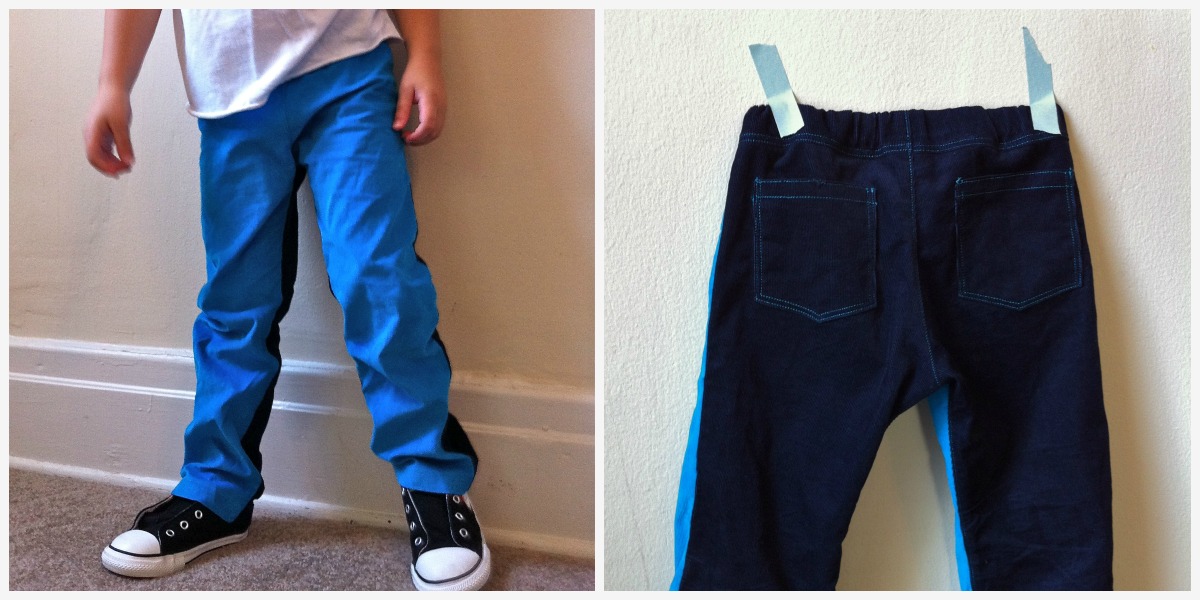
This first pair is inspired directly by those Kors men’s pants that are different colors on the front and back. Using Dana’s fantastic kid pants pattern, I simply cut the front pattern piece from peacock blue corduroy and cut the back from navy. Not much to explain there, but it’s something I never would have thought to do before.

I also cut them a little skinnier (see below) and added back pockets with contrasting bright blue topstitching. I think back pockets are such a great way to make pants look much more polished and professional. I basically make mine like this tutorial. You can use an existing pair of pants to make a pocket pattern.

I couldn’t stop at just one pair of CB pants, (despite my husband’s looks of great concern for my sanity) so I decided to try it with contrasting bottoms this time. They look pretty cool cuffed with some chucks.  The result is just like this pair, but pieced instead of painted. That’s what I’m going to show you how to make today.

But first you can very easily make them fit slimmer if you prefer. I did this by marking a line on the bottom of each pattern piece, 1.25″ in on the inseam side. Continue to draw the line up so that it’s perpendicular to the other straight side of the pants. Then as you get closer to the crotch, ease the line into that curve. Make sure you measure the same amount in on both pieces, and your pants will line up without a hitch.

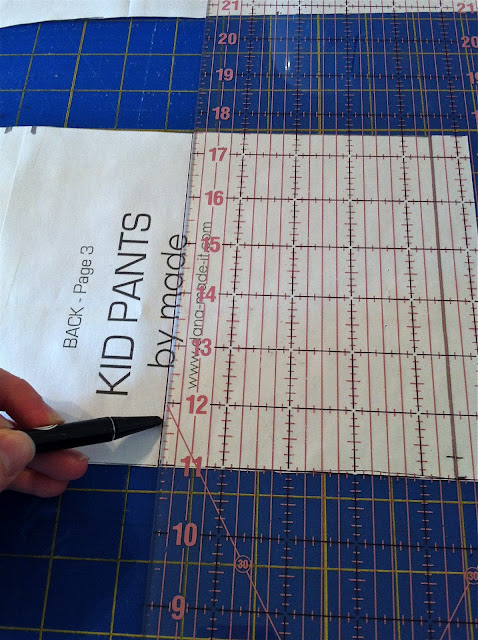
Now I’ve cut the new shape out of my pattern and I’m going to figure out where to cut again for color blocking. First, cut a piece of string to the length you want the main fabric of your pants to be before the contrast color starts. I wanted my contrast well below the knee and I cut my string to 11.5″. However, my son is tall and I have to add a few inches onto the bottom of this pattern for him. So if your child fits the pattern as is, you might want to take 2-3″ off of that length.

Use your string to start at the point of the crotch and measure down the inseam to mark the pattern at the end of the string. Of course, you want to keep it flush against that curve, which I wasn’t able to photograph very well.


Use a ruler to draw a line at that mark all the way across the pattern, keeping it perpendicular to both sides. Cut the pattern on that line and repeat the same process with the string on the other piece. It’s also helpful to write “front” and “back” on those bottom pieces now so you don’t get them confused.

Now cut all your pieces from the two fabrics, cutting two pieces on the reverse from each like normal. HOWEVER: be sure to add 3/8″ for seam allowance to the bottom of the main pieces and top of the contrast pieces. In other words, on the edges where you cut the pattern apart.

Now you are ready to sew the pants together as usual. But when you sew the inseam, pin very carefully so that the contrast seams match up perfectly. Do the same when you sew the outside seams, hem as usual, and you are done!

If you like this look, you should also check out Blue-Eyed Freckle’s tutorial for how to add a contrasting bottom to existing pants.

Thanks so much for having me Meg, I can’t wait to see what pops up in the flickr group. Maybe I’ll even get to see some color blocked pants? Happy KCWC sewing everyone!

* * * * * * * * * * * * * * * * * * * * * * * * * * * * * * * * * * * * * * * * * * * * * * * * * * * * * * * * * * * * * * * * *
Thank you Jessica! 

kcwc is only a week away!

sorting patterns for kcwc

That right! The Kids Clothes Week Challenge is next week already: October 8-14. I like to have a weeks worth of guest posts before kcwc to get you extra excited and inspired. Last year, I had five talented bloggers sew their version of Rae’s Flashback Skinny Tee. I loved seeing one pattern done so many different ways (see them here: 1, 2, 3, 4, 5). One of those ladies, Heather from Well Crafted, went on to use the pattern for every. singleone. of her kcwc projects! This fall I thought I’d do the same thing with a different pattern. I have five new phenomenal bloggers who took Dana’s Kid Pants pattern and worked their magic on it. I can’t wait to show you!

But first, last year I asked you to get the word out about kcwc and wow! did you ever get the word out! We had almost 700 participants sewing along dutifully every night for one week! So I’m going to ask you again. There are 250 people signed up already, but I bet you guys can double that in no time.

  • If you are on facebook share the fall 2012 kcwc link: http://www.elsiemarley.com/kids-clothes-week-fall-2012.html
  • If you are on twitter, slap a hashtag on it #kcwc.
  • If you are on instagram, take a picture of your beautiful piles of fabric. Then slap a hashtag on it #kcwc!
  • If you are on pinterest, pin patterns, fabric, tutorials. Then, say it with me now, slap a hashtag on it #kcwc!
  • If you are on flickr, join the elsiemarley group and get all your flickr friends on board!
  • If you have a blog, write up a list of all the things you plan to sew or what patterns you are excited to use.
  • Get your friends and your mom (and her friends) on board too!

Let’s make this kcwc super huge! The more people there are sewing next week, the more people there are motivating you, the more you’ll get done!


kcwc fall 2012 pinspiration

kcwc inspiration

  1. bright blue elbow patches
  2. dress with purse/pocket
  3. cozy poncho
  4. yellow pants and awesome shirt

Are you thinking about kids clothes week, yet? Have you been spending unnecessary hours on Pinterest looking for inspiration? This year I thought we’d try having one huge kcwc community pinterest board. Doesn’t that sound awesome? If you leave your pinterest username in the comments I can invite you! We can fill the board with tutorials, patterns, fabric, awesome kid clothes both handmade and factory made. Pin your sketches! Pin your lists! Pin your piles of laundry! No, not the last one, unless it’s piles of dirty handmade clothes.

So leave your pinterest name in the comments and then go pin all the amazing things you are planning to make.