
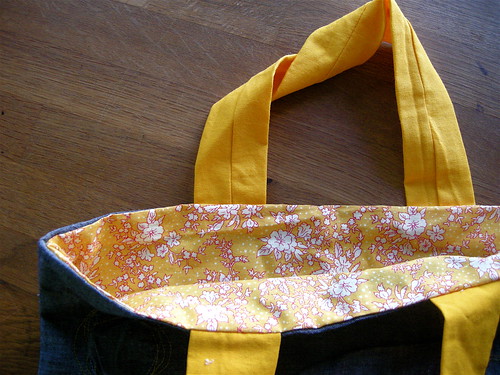
I made another nursing bag for a friend (babies all over the place these days). This time I wanted to make a styley one from a japanese craft book I picked up a while back. Normally, I wouldn’t ever buy a book about bags, I mean it’s just a couple of rectangles sewn together, but of course this japanese one was too awesome to pass up. For all those in the midwest who are interested, I got mine at Mitsuwa outside Chicago. It’s a japanese supermarket/bookstore/cafe and it’s super close to Ikea, which just makes it even better. I know they say the diagrams in japanese craft books make them easy to understand, but really I think you need to know how to make it (whatever it is) before you start. This bag really is two rectangles sewn together, which I can do thankyouverymuch, but the circle detail is the cool part and I’ll be damned if I can figure out what the directions say. So I just made it up. I cut out the front piece slightly bigger than the back. Then sewed circles with the longest stitch on my machine. I pulled the bobbin thread to gather the circles a little–they don’t have to be perfect and really irregular gathers look better. Then I sewed around the circles again a bunch of times with contrasting thread to secure the gathers. I pressed it, then sewed the rest of the bag together. The other nice detail on this bag was the twisted handles. I think I “misread” the directions and pressed the seam of the handle to the middle, which sucks, it would look nicer if it was hidden on the edge, but whatever. I still think the idea of twisted handles is great and I’ll use it again for sure.
see more of the book here and here and here.
Posted in sewing. 8 Comments »

I am super excited about this little project: it’s an embroidery sketch book! Now that it’s springtime here in the midwest–and what a lovely spring it is, by the way–we are outside most of the day. Unfortunately, I don’t know how to knit or crochet, so the only portable project I have as a sewer is seam ripping, which is less than pleasurable. After doing a little embroidery for a quilt square I was reminded how much I like to embroider. If I came up with a real project to embroider I wouldn’t want to take it outside because it would inevitably get dropped in the sandbox or hosed down by the sprinkler, so I made a little book out of fabric and cardboard to take with me. I just cut out a piece of lightweight cardboard (from a cereal box) for the cover, making sure it was a little bigger then my smallest embroidery hoop when folded in half, so I could use the hoop for all the pages. Then I traced the cover onto some fabric (adding seam allowances), made a pocket to go across the whole thing, sewed up 3 sides, slipped the cardboard in, and sewed up the opening. Then I cut some gray and white linen for pages and sewed up the middle. Done. When I was thinking about making this sketch book, it was much more elaborate with lots of pockets and pin cushions (more like this) but in the end I wanted something I could make fast, use up, and then make again. Now we’re off to the park.

For more photos look here, and here.
Posted in craft. 18 Comments »

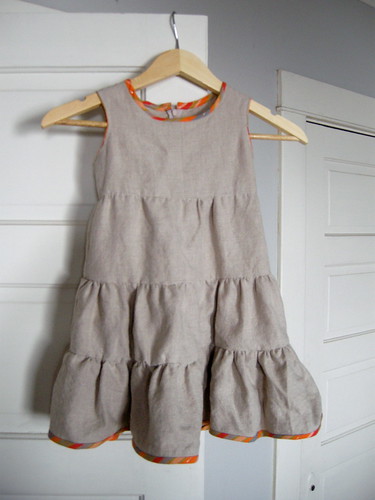
I wish I could say I just whipped this up, but it actually was kind of a pain with my pregnancy brain. It’s from Weekend Sewing by Heather Ross which I was lucky enough to get at the library–the wait for it now is a year, I think, and for good reason it’s an awesome pattern book. I tried to make a kimono like this from Martha Stewart when my kids were infants and I could not for the life of me figure out the directions. I think the pieces are still cut out somewhere waiting for me to get a clue. These directions had a little mistake in them and the more I looked at them the more confused I got. Finally I gave up and then of course I figured it out: all it needed was a tie on the inside (the directions make it so all the ties go on the outside).

And voila! The fabric is a really lightweight denim or chambray maybe–is chambray just a really lightweight denim? And it’s this lovely gray/black/navy bluey color. I got tons of it at a mill end shop and I love the way it drapes and wrinkles a little like linen. It’s supposed to be gender neutral, but I think it looks a little on the boy side, so I may just whip another up because I could whip it up this time. I made the bias tape (another reason this project took longer than it should have) and while I was at it I made more to finish the dress I started last year. Well at least it still fits her. Just.
Posted in sewing clothes. 13 Comments »
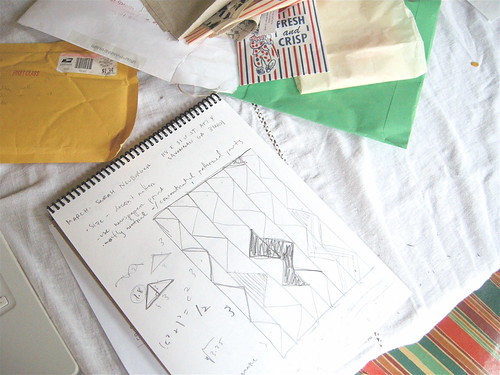
Normally I don’t get to work on the dining room table. Never really. And it’s the perfect table for spreading out and getting shit done, but for now it’s full of half eaten peanut butter sandwiches and broken crayons. Soon enough I suppose the little ones will share the space with me, but at least I get wednesday mornings here. I’m trying to get caught up–I am waaaaaay behind–on my one quilt squares. I am very much a quilting novice and I completely underestimated the amount of geometry I would need to design these blocks (at 9 o’clock no less. Me and 9th grade! we are rocking the hypotenuse this morning).
look here for more creative spaces
Posted in swaps. 16 Comments »
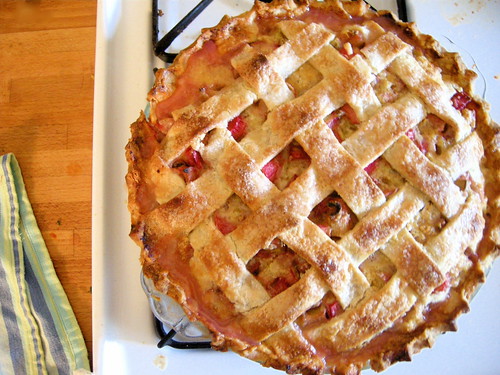
I made a rhubarb custard pie yesterday after picking up some lovely rhubarb at the farmer’s market. My mother made this pie every spring and would always say that it proved the existence of god. And really it is damn good. The recipe is from Betty Crocker and it’s quite simple, but the lattice top makes it look extra impressive. I took some pictures while I was putting the pie together and though I’d share a little lattice top tutorial so all your pies can look fancy fancy too.
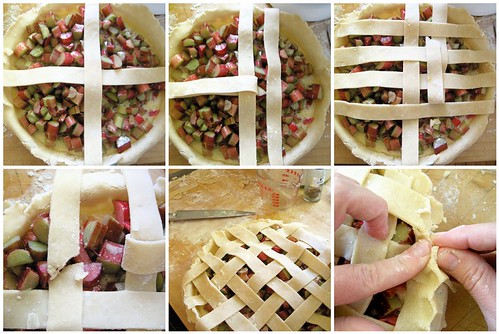
Make enough pie crust for a 2 crust pie (there is a good recipe here). Roll half out and line your pie pan, put you filling in and pop it in the fridge while you roll out the other half of the dough. Roll the second half out just like the first: about an 1/8″ thick and slightly bigger than your pie pan. Cut the whole thing into one inch strips. Now place two of the longest strips in the middle perpendicular to each other. Fold the strip that is underneath back over the strip on top and add another parallel to the one on top about a half an inch away. Continue weaving the strips by folding every other strip up and putting a new strip in. If your strips are broken or you don’t have enough long ones, just hide the broken bit under another strip and no one will ever know. When you’ve covered the whole top, seal the pie by pinching the top and bottom crusts together (two fingers on the outside and one on the inside, just like the picture) around the whole pie. With a sharp knife cut all the excess dough off and stand back and admire your work. Before putting in the oven be sure to brush the top with cream (or egg wash) and sprinkle with sugar. This will make the lattice top look even better.
Rhubarb Custard Pie
from Betty Crocker
3 eggs
3 Tbsp. milk
2 cups sugar
1/4 cup flour
3/4 tsp nutmeg
4 cups cut-up rhubarb
1 Tbsp butter
Beat the eggs and milk in a large bowl. Mix the sugar, flour and nutmeg together and add to the eggs. Mix well. Add the rhubarb and stir. Pour into your prepared crust. Dot with the butter. Cover with lattice top. Bake for 50-60 minutes at 400 degrees (Fahrenheit) until nicely browned. Serve slightly warm (with vanilla ice cream!) or cold for breakfast the next day.
Posted in food/recipes, tutorials. 13 Comments »


