I’m feeling a little less than creative these days, more scattered and listless–maybe it’s the change of seasons. Also, I can’t find the damn camera cord to upload my pictures, so you are stuck with this link link linky post. But it’s good.

I recently discovered the newish blog lightbluegray and I went a little crazy for this cowl she made for her daughter, especially the bright yellow Xs. All of the blog is fantastic, check out her nightstands and embroidered sheets!

This display via Blosoem is some sort of paper mache/paper bag awesome.

I have always had a thing for laundromats–used to live above one even–and this one takes the cake. It’s like living in a roll of washi tape. via hi + low
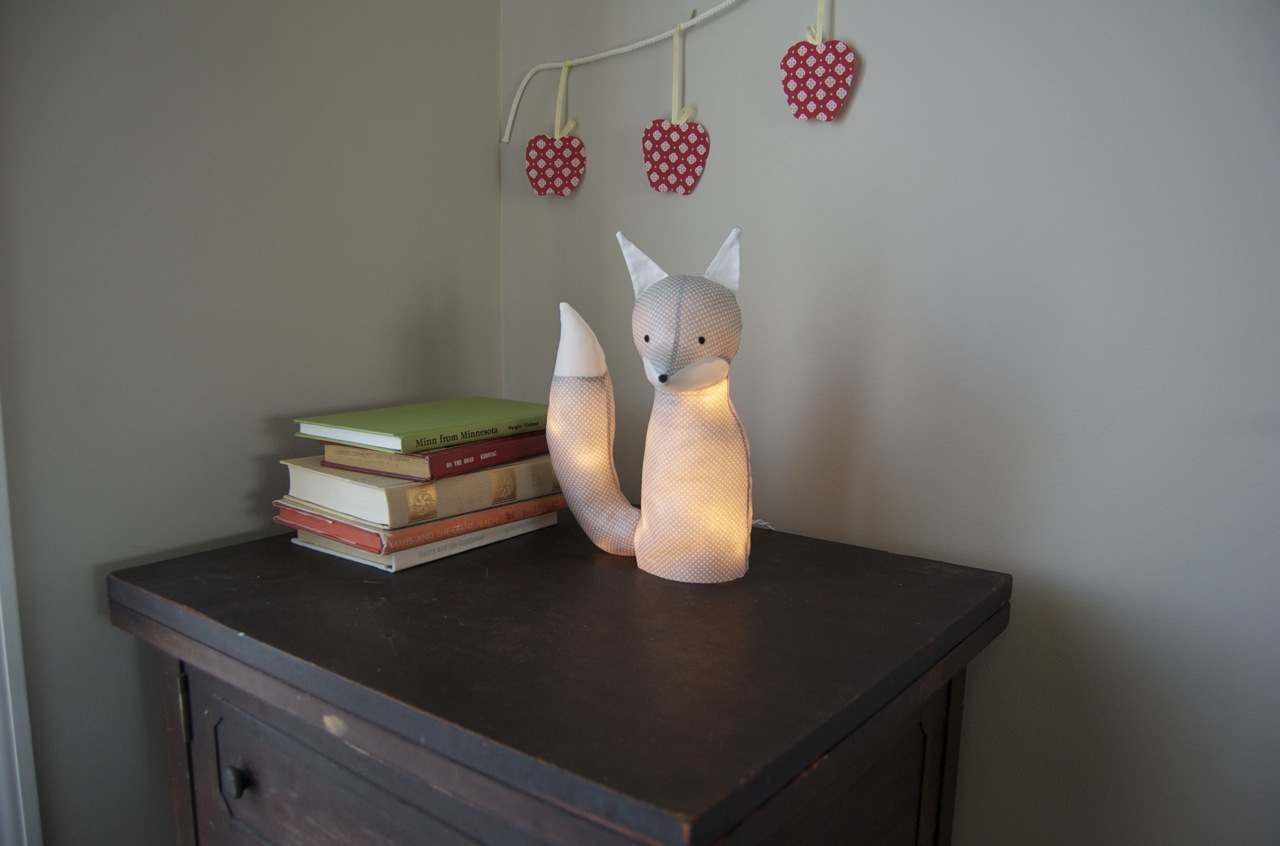
how fantastic! turn your plush into lamps (via whip up).

And do you know about pillow week over at erin’s house? I plan on making the pillow version of this bedspread. If you want to know what other things I like you can look at my tumblr: things on the internet that are pretty.
Posted in inspiration. 10 Comments »

This idea came about when Abbey from Aesthetic Outburst threw a fabulous birthday party with a “hand-stitched/granny chic theme” and as one of the decorations she painted a cross stitch design on a pumpkin. The whole party was beautiful, but this idea was extra awesome and I thought maybe I could cross stitch for real on a fake pumpkin. The project turned out even better than I hoped and so I’m sharing it with you. I know there are only 5 days until Halloween, but this is a quick-ish project and the pumpkins will last forever.
How to Cross Stitch on a Pumpkin:

Materials
- a fake pumpkin
- thick yarn
- a bamboo skewer (the ones you use for kebabs) or an ice pick or something similar
- a yarn needle
- a pencil

Directions:
1.) First you need to choose a design. I found some great, simple Halloween cross stitch patterns here, but feel free to design your own. It’s easier than you think, I made a bat and a boo! by playing around with Xs in my sketch book (go ahead and copy mine if you like). Just remember, simple is better for this project and try not to put any of the design near the hole on the bottom of the pumpkin because it’s very hard to stitch there.
2.) Next, transfer the design to the pumpkin. To do this, I looked at the pattern and then with a pencil I made very light dots for where the ends of the Xs go (see photo above). I thought about coming up with some complicated way to get your pattern perfectly onto the pumpkin, but really I love the look of free hand cross stitch and I don’t think it needs to be perfect. If you want, you can lightly draw all the Xs on the pumpkin because the yarn will cover them up anyway.
3.) Now you need to poke all those holes. Take the bamboo skewer and poke straight down into the pumpkin.

4.) Ok, time to cross stitch. All I know about cross stitch I learned five minutes before I started this project! Thread your yarn needle with a piece of yarn no longer than your arm, no need to tie a knot. Stick you hand in the pumpkin (if you hand doesn’t fit or it’s a squeeze, do yourself a favor and make the hole a little bigger) and insert your needle into one of the holes you’ve made. It can be difficult to find the right hole. To help, take your skewer in your other hand (the one not holding the needle in the pumpkin) and stick it in the correct hole, then by feeling for the skewer on the inside you can find it and draw your needle through. I started sewing at the bottom of my design and Xed my way around until I was done. It’s fastest to sew with both hands: one staying in the pumpkin and one out.

And that’s it. I think this project could go so many ways. A ghost done on a black pumpkin with some super fuzzy white mohair would look super cool. You don’t need to stick with cross stitch–any simple embroidered design would work. Go crazy with it and if you do be sure to add it to the elsie marley flickr group so we can all see! Happy Halloween!
Posted in halloween, holidays, tutorials. 40 Comments »

Since I crocheted over a stone a while back I’ve been working on little crochet projects here and there. It’s nice to have a little project to work on for no other reason than it’s enjoyable to do. Crochet can be so odd and sculptural, like this potholder: it looked like some leggy sea creature when I was working on it and then with the last row it suddenly came together and became a beautiful flower with folded petals. (Here is the ravelry link if your interested in the specs)

I’m not sure if these projects will be gifts or not, but the baby seems to think we’re keeping this one. Crochet can get very crazy, very quickly and this very apparent with potholders for some reason, but these bears are restrained enough to be just the right amount of cute.

Though I failed horriblly at facebook, I’m kind of enjoying twitter. If you would like to listen to me blather on about nothing at all there, I am elsiemarleyblog. Hey, have a good weekend!
Posted in crochet. 12 Comments »

I made a curtain for my kids’ closet this weekend. Not a big deal, but I hate making curtains, no, haaaaaate making them, so it’s a big deal for me. It’s just so much hemming and I kind of suck at hemming, but the curtain isn’t as bad as it looks–though it is a little straighter on one side. There are more curtains that need to be made and I’m trying to psych myself up for it. I finally after three years of living here have picked out fabric, but haven’t ordered it yet. I want to try this roller shade hack, which looks easy enough, and roman blinds, which look hard. Has anyone had any luck with them?

I also cranked out some fitted sheets for the kids’ beds. I simplified the process a bunch from last time I made sheets. The edges are serged not hemmed and the elastic is only around the corners. I was able to get two fitted sheets (for my kids’ weird size beds) out of one full size flat sheet. That means the pattern is sideways, but they couldn’t care less. The flannel sheet has deer and bunnies and someone about to get pelted by a snowball right in the butt.

Oh and I have some of that ikea bunting fabric left, do you think it would be ridiculous to make my son pants out of it? Would dying it gray help? or should I just make pillows and call it a day?
Posted in my home, sewing. 25 Comments »

I went back and forth about buying it, because it was ten bucks, but in the end I got it and I’m glad I did. I duct taped some batteries in (why do we have a thousand C batteries on hand?) and the sucker works! Push the green button and the conveyor belt moves, slide something across the scanner and it beeps, and if you push the yellow numbers a bunch of times the receipt pops up.

On the conveyor belt: bananas, a calorie counter book (really, why?), gouda, asprin, toothpaste, cookies and shoe polish. This is definitely an old man’s shopping list–a slightly overweight old man, in the eighties with a hangover. Meet the toy designers of the past.
Posted in thrift. 18 Comments »


