Posts Tagged ‘calendar’

advent activities

pompom garland and my christmas tree

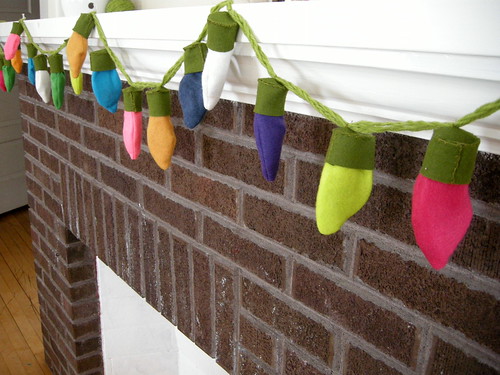
Today is the first day of advent! Did you make your advent calendar yet? We are still using the string of lights advent calendar I made a few years ago. I put activities in each of the little bulbs and I love it. I write up the activity the night before (surprise your kids, not yourself!) and all the projects keep me on task for christmas.  If cookies need to be made, or christmas cards written, or gifts wrapped it’s going to happen if it is in the advent calendar–the 4 and 6 year olds will demand it!

A friend of mine (hi Ellen!) asked me to write up a little list of activities she could use, so here they are! I divided them into effort needed, because sometimes you really need to drink some (spiked) eggnog while the kids watch a movie.

meringue snowmen

big projects

gingerbread mobile

little projects

hot-cocoa-mix

if it’s cold and snowy projects


snowman coloring page

phoning it in projects

  • hot chocolate with marshmallows
  • call grandma and grandpa
  • dress up like an elf/santa/wise man/christmas tree
  • dance to christmas music
  • camp out under the tree (this may or may not be an easy one)
  • color christmasy pictures–oh look I have a bunch right here
  • look at pictures from christmases past
  • I think one year I actually wrote down “eat christmas cookies” for an activity

our little christmas tree

for the whole family

  • drive around looking at chrismtas lights
  • dress up in your fanciest for dinner
  • make popcorn and watch a christmas movie
  • go see the nutcracker/christmas carol/holiday concert
  • cut down a christmas tree/ put up your christmas tree
  • decorate the tree!
  • put up lights outside
  • go for a evening walk

string of lights advent calendar

This list is my no means exhaustive. Some of these we do every year, some are new ones I’d like to try. Do you have any christmas activities or projects for advent? I’m always on the look out for good ones.

blog tour: crafting with kids by Jennifer Casa

Jennifer Casa, from the fabulous blog Jcasa handmade, has written a very nice kid’s craft book called Teach Yourself VISUALLY Crafting with Kids and it is jam packed with projects for all your kids. I asked my daughter to look through the book and see which project she’d like to make. The answer turned out to be every single one.

So, I sat down with her and we leafed through the book together.  When we got to the Daily Docket project, I knew this was the one. Perpetual calendars are one of my very favorite things and as an added bonus we had almost all the materials on hand to make it.

writing the months

Well, we didn’t have alphabet stamps, or rather we had L, Q, H, B and R, but we weren’t  playing Wheel of Fortune so it didn’t help us much. So instead of stamping the months and days on fabric I had my daughter write them on with a fabric pen. When she was finished we cut them out and glued them onto felt. I knew I was going to regret the glue I used and I did, because bleh, it shows through.  I should have sewed them or rustled up some fabric glue, but whatever.

putting everything together

For all the letters and numbers and clouds and things, I had my daughter draw them and then I made patterns from her drawings. This was a totally unnecessary step, but I think it made the project more hers than mine (which is was supposed to be, right?). The weather bit isn’t in the directions, but I had just seen Abby’s felt weather board and I thought it would be perfect with this project.

working together

Because there were more little bits now with the weather forecast and because my children love to organize things, I sewed four pockets instead of making one big one. O.K. maybe I should stop, because wow, Meg, you sure are taking a lot of liberties with this project. I mean this is a review of a book, right?  I did make changes here and there while we were making the calendar, but that’s what is so great about this book. There are so many simple projects in this book that you can use them as jumping off points for your children’s crazy creativity. It’s nice to have tutorials and books that teach us to make something just so, but it’s also lovely to have open ended projects that your kids can enjoy over and over again, each time in a new way.

calendar detail

I made one more little change to Jennifer’s awesome project, one that I was kinda sad about. I used a stick (straight from the yard) to hang the calendar instead of grommets. The grommets are one of the coolest bits of this project, but sadly,  I am not cool enough to own a grommet setter. So a stick and some loops and ta da! a fantastically homemade perpetual calendar. So many good things rolled up into one!

felt calendar

Thank you Jennifer, for including me on your blog tour for your wonderful book! Would you like to own your very own copy? Jennifer has kindly offered a signed copy shipped to the door to one of my dear readers. Leave a comment on this post and I’ll pick a winner on Wednesday! Good Luck!

There are a few more stops on the bloggy book tour and some more chances to win a copy too:

THE GIVEAWAY IS CLOSED! KRISTA, #7 WON! YAY KRISTA!

sewing calendar

No baby yet (two days overdue and counting) but this is pretty damn exciting. I’m in a calendar! and I’m not naked in it! This is a pretty fantastic calendar, one I might even pick up if I wasn’t in it–and I’m pretty cheap, I mean I draw my own calendars monthly. There are so many fantastic projects in here:  two each week. It’s just the right amount because you could actually do two little sewing projects each week.  And there are so many fantastic bloggers in here like Ellen from the long thread, Alicia from the Mayfly, Dawn from UK lass in the US, and the listed of talent just goes on and on.  I’ve got 2 projects in the calendar: the tin can cover (hey look it’s on the cover!) and the post office bag, oh wait I found another in there, the half eaten gingerbread man (all my tutorials are here, if you are interested). I can’t believe I’m thinking about Christmas yet, but I am, and this would make a great gift for a lot of people on my list. I have no idea if it’s in stores yet, or what stores it will be in, but if I see it in one I will surely freak out and tell everyone I know.

string of lights advent calendar pattern

Here it is, the string of lights advent calendar tutorial (and pattern!). I made the pdf pattern file all by myself for the first time, so if you have problems with it just email me and I’ll try to fix it. Otherwise, hurry up! because advent is almost over!

materials

green wool felt
multi-color felt scraps
60 feet green yarn
green embroidery thread
lightweight treats (gum balls, dum dums, love notes, tiny ornaments)

pattern

download here

directions

Cut the yarn into six equal pieces (10 feet each or 120 inches each or about 3 meters each). Take three pieces and braid them together. This is more difficult then it sounds, but if you roll up the slack and just work with a little yarn at a time it’s much easier. Braid the other three together the same way. Then twist the two braids together and knot the ends.  It will stay twisted when you sew the lights to it.

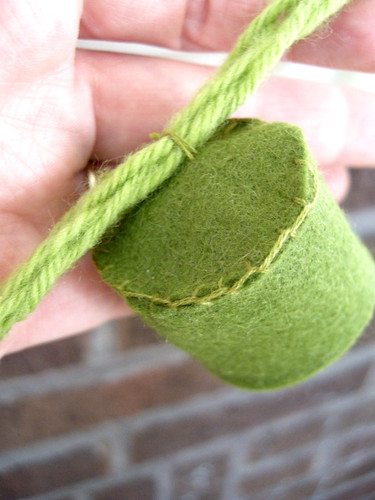
Cut out 25 (or 24 or however many lights you want) circles and rectangles. Create the socket by sewing a blanket stitch to the edge of rectangle and the circle attaching them to each other.  If the rectangle is slightly longer than the circumference of the circle clip it to fit and continue sewing the ends of the rectangle together. Sew the sockets onto the cord–one every three inches.

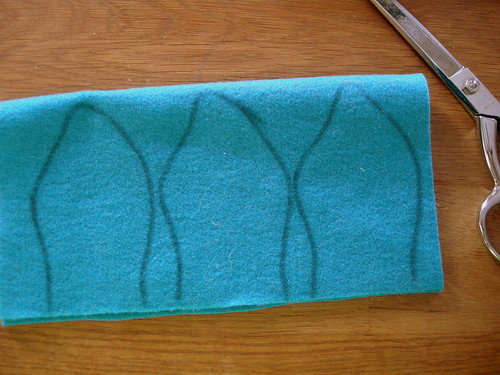
Cut out the light bulb pattern piece. To sew the lights up faster you can fold your colored felt over and simply trace the pattern onto it with a marker (permanent or not it doesn’t matter) then sew the two pieces together staying inside the lines.  To be safe test the first light to see if it fits: sew and turn out, put a treat or two inside, then fit it inside the socket and see if it stays when it’s hanging upside down. If it slips out, just make the lights slightly bigger.  If you’d rather use the lights for decoration and not for treats you can stuff the light bulbs lightly and sew them onto the socket.

I didn’t really finish the ends of the cord (I just tied a knot on both ends).  But it would be sweet to make a little plug out of felt to hide the knot. To do this cut out four extra “socket bottom” circles and two extra rectangles.  Cut a slit in the middle of one of the circles and insert your knot, then attach the rectangle, just like you did for all the sockets, and attach the other circle to the other side–making a  round (European style) plug. You can even make some prongs out of felt to complete the look.

download the pattern here.