Posts Tagged ‘diy’

bleach

I use bleach. I know I shouldn’t, but it just gets things so damn white. I do clean just about everything else with baking soda or vinegar, because they clean just about everything else. But when you have been potty training a certain little boy for over a year (there’s something that’s not so much fun to celebrate) bleach it is. Also, I’m a little sloppy and tend to splash the damn bleach on my shirt, only of course when I am wearing one that is A.) new or B.) my favorite. So after seeing all of Amy’s fabulous bleach pen projects in her new book, I thought I’d rescue a couple of my shirts.

DSCN0757

Here is the before picture of the first shirt I did. It looks a little weird because I ironed some freezer paper on the inside before I remembered to take the before shot. I know is just a cheapy target shirt (that describes 80% of my wardrobe) but it fit me well. So of course I had to splash bleach on it.

DSCN0853

And here is the after. Yes, I am trying too hard to look cool, but it’s not easy to take a picture of yourself without trying a little. I read the directions for this project after I actually did the project (smart), so I didn’t realize that Amy uses a smaller tip over the bleach pen to get a thinner line. That would make your design look a little crisper, I think, and better overall, because really I’m not fooling anyone: it looks like I drew on this shirt with bleach. But it is a slight improvement over the before and I can leave the house in it without feeling like a total slob.

DSCN1199

This is the second shirt I did. I know it’s hard to see the spots, but they were smack dab in the middle and very hard to disguise.  I wanted to do a color wheel shirt, much like this one modeled by the lovely Martha (I could not find another photo of it on the internets anywhere). I’m pretty crazy for the color wheel right now (like this print I love). I feel like it’s a grown up version of the rainbow, which is very big in our house at the moment. I was never one for rainbows, but they are growing on me.  Anyway, the shirt. I wanted the circle to be wonky and off center and partly off the shirt, but the bleach spot dictated where it would go and it ended up just a tiny bit off, which makes it look more like a mistake. Really there are tons more mistakes, but I don’t care, I love it.

DSCN1249

I borrowed this stuff from a friend of mine that turns all acrylic paint into fabric paint when you mix it in. It’s made by Golden and called GAC 900 fabric  medium. It works pretty well as far as I can tell. You just mix it 1:1 with the paint and you’re good to go. I think I should have used a little less paint and more of the fabric medium stuff because the shirt is a little stiff in parts, but it’s been through the wash a few times already and looks great. Though with all that bleach on it (the pinky color was made with a bleach pen) I’m sure I’ll wear a hole in it quickly, but i don’t mind really, I’d like a reason to make another shirt like this.

before and after

I feel a little funny calling a post “my bathroom” so we’ll just stick with before and after, because that’s what this is.

old-sink

My bathroom is 8×6: a sink, a toilet, a bathtub, and an obtrusive radiator all fit in the tiny space and accommodate this family of 5. The photo above shows how it looked three years ago when we moved in. It wasn’t great, but it came with the house so we had to work with it. The pedestal sink was nice and skinny and all, but we own things and they need to go somewhere. There wasn’t anything wrong with the sink so there wasn’t any need to replace it, though I did hate it. The toilet topper, or whatever the hell those things are called, went out right away which made the bathroom feel much bigger. A year later, my brother was installing a light in the ceiling and dropped his hammer on the sink. Suddenly we had to replace the sink and super fast because my brother was leaving and he knows something about installing sinks, whereas we know nothing. The sink and faucet came from our local hardware store and the cabinet was a lucky, lucky find at an antique shop. It was 100 bucks, which I thought was crazy expensive, but all that storage space has been worth it.

during // pretty bathroom on elsie marley

This is a during shot. It’s hard to tell from the picture but the people who owned the house before us ripped off the tile that was on the wall and then just painted, just painted over the glue that was underneath. The tile was a peach colored plastic tile, but still, you can work with that a little better than painted glue. Why this didn’t tip us off to their halfassedness I don’t know–you are just blind when buying a house for the first time (or at least we were). You think you’ll just fix everything up lickity split. Yeah, that doesn’t happen because the water heater breaks or the basement floods or you build a fence in the backyard or go and have more kids (or all of the above plus some). So I am embarrassed to tell you how long ago I took this during picture.  But it doesn’t matter now because it’s done!

pretty & thrifty bathroom // elsie marley

I had to plaster and sand and plaster and sand and plaster and sand over the glue, but that 6 dollar bucket of plaster made a huge difference. I painted it white and painted the top bit peacock blue, which is my new favorite color. The shiny thing attached to the cabinet is a mailbox! I trash picked it a few years ago  (why? I don’t know.  We didn’t need a mailbox, but I can’t resist good trash). It holds books and magazines and has an added bonus of protecting them from all the sink splashing my kids do.  The toilet paper holder is an old warhead box–really it is–that I stole from my high school boyfriend. The owl we got as a wedding present and the picture above it was a thrift store spurge.  I got the metal first aid kit off ebay and we keep all the medicine locked up in it, so the kids don’t get into it.  The paper whites bloomed just for the picture and the hanging plant is called string of pearls, which is a pretty succulent.  All in all I think we spent a little over 300 bucks (and three years) to get it all done.  So there, now you more about my bathroom than you ever thought you wanted to. There are more pictures on flickr if you want to see more!

*edited to add: the paint is called Realm and it’s made by Behr!

bathroom hooks

There might not be much sewing going on in these parts, but there are little home fix-it things happening every day. Nothing like having a baby to make you fix the damn doorknob already (thank you, dear).  This little, vaguely eames, coat rack is in our bathroom–making it a towel rack really, but whatever. The idea is all Martha and it came from her book “Simple Home Solutions,” which I’m sure your local library has and you should check it out. I canceled my subscription to Living a few years ago because it seemed they just started recycling ideas over and over again. Turns out they picked the good ones and put them in this book and a few more might just show up here.

There were quite a few steps to make these simple looking hooks. When I bought the hooks at my awesomely helpful Ace hardware I asked them to hack off the tips of both the hooks (if you have a hacksaw you could do this yourself). Then I spray painted them white, because I didn’t know I wanted them white until after I got them home (they sell white ones, so I could have saved myself some inhaled fumes).  My husband helped me drill a hole in each wood ball–Martha doesn’t tell you how big the hole should be, but when you jam the ball on the end of the hook it should just fit. Then I painted and shellacked all the balls, fretted about the arrangement, and hung the suckers up. I have two more lower down for the kids that aren’t quite done yet, but they will get done unless I have this baby sometime soon. Yup, still pregnant over here even though I’m due today (hear that baby?!). Grannyma took the kids for a couple days, so all we are doing here is waiting. Quietly waiting.

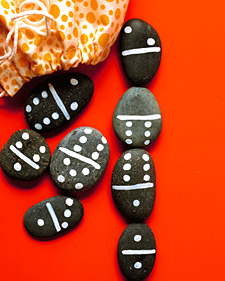
Speaking of kids and Martha Stewart. This is project I wanted to do, but I don’t live near a place with lots of beautiful flat rocks and my local craft store didn’t really have that great of a selection. We actually bought our daughter dominoes for that “the new baby is here” present. Dominoes are a fantastic toy for preschoolers and I thought I’d share this project with all of you who live near a rocky shore, unlike us land locked Midwesterners.

chair patch

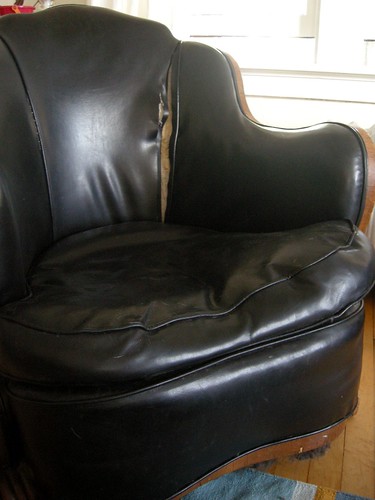
This chair has had a blanket casually draped over it–hiding that big ol’ rip–for quite a while now.  It was getting pretty annoying, so I finally formulated a plan to fix it. I saw this fantasticly awesome patch job on flickr a long time ago and have been wanting to do something like it ever since.  You might remember the weird S&M vinyl sewing action here a few weeks ago, well it became a loooong strip of black vinyl hexagons (not paper pieced, I’m not that insane, you can sort of half ass hexagons on your sewing machine–see all those wrinkles? yeah, half ass).

and then using an obscene amount of glue I patched the hole. And it worked!

This chair was a trash pick by someone else and then a gift (to me!) when they moved out of town. It feels good to breath new life into it, for a few more years at least.

And for all of you who have so kindly emailed asking: no, no baby yet. I’ve been slowly loosing my mind the last few weeks and now I’ve just given up. I will be pregnant forever. Granted I’m not due until Monday, but all the signs are there and besides haven’t I been pregnant long enough? shesh.  Oh well, bring on the spicy food and sappy movies!

wedding

There has been a lot of weddingness all over the place these days. Craftzine had a handmade weddings series going and well I guess summertime is just a time for weddings. My best friend from high school is getting married this fall, so I’ve been looking at dresses and cakes and cute little wedding things for her. All of which has made me think about my wedding 6 years ago. We tried to be cheap and crafty and we were, but shesh not as crafty as brides and grooms these days. I was on craftster constantly while I was planning it and I remember I could click to see the day’s new post and there would be about 20 of them. Ha! now it’s a crafty behemoth! Anyway, this is all just a ploy to share what I made for my wedding, hoping that it will give others ideas. First the invitations:

I used balsa wood for the main invitation, painting a red/orange/pink stripe across the bottom and gluing the actual invitation to the back. My printer was my best friend for all of this and the map was my baby. We got married in the middle of nowhere (on the farm where my mother grew up!) so the map had to be detailed, but of course stylish as well. I am embarrassed to admit just how many hours I spent on it. And I have a huge mental block when it comes to any image editing software: I learn it for about 10 hours and then forget everything and have to relearn it all again.

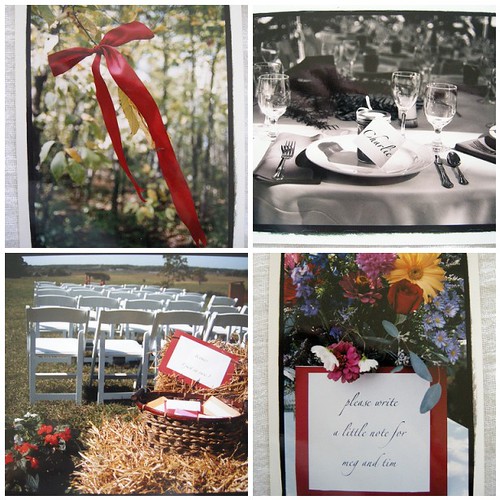
A few crafty things we did: my sisters tied red ribbons on all the trees on the path that led up to the hill where we got married–it’s hard to decorate the woods, but this worked really well. My mom made jam for all the guests (thanks mom!) and I made a tag for each that then served as the place card. There are so many little things to do for a wedding, anything that can do double duty should. I don’t know if any one used these (the photo says, “tissues, just in case”) but it was a Martha idea that was easy and useful (I think I was still making them on the way to the wedding). And the last picture isn’t really crafty, but it was an fantastic idea (not mine). Instead of having a guest book, we had a stack of cards and asked the guests to write a little note to us and drop it in a bowl. It was much more personal then just a signature and I still like to read them. There were lots of other little things. I made stickers with numbers on them and printed all the guest’s names out of small pieces of paper, then we could stick the numbers next to the names for escort cards at the last minute because arranged seating is a delicate dance. We strung up a clothesline and clipped photos of ourselves when we were kids onto it–it’s nice to have something for the less social (usually me) to do while avoiding talking to people. And a bunch of other stuff, luminarias, programs, table numbers, candle holders. Weddings are a lot of work.

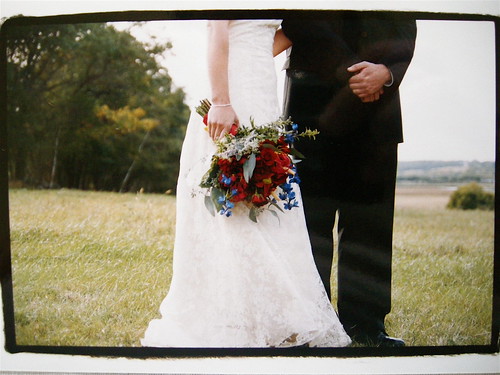
My dress was made out of my mother’s wedding dress, which was in such poor shape it couldn’t be repaired. I found a seamstress who specialized in vintage fabrics (in Chicago) and she created this amazing dress. I think she had, literally, a small handful of the original lace left when she was done. Not the nicest of women, but damn she could sew.

The piece d’resistance of my cheap and craftiness was this polyester fabric. I ordered 50 yards of it in red and pink from ebay (for like 20 bucks, it was ridiculous) and my brother climbed the tallest ladder we had to staple all of it to a tree branch (if you can’t tell that is at least 25 feet up). The tree was at the beginning of the path to the lake where we had our reception and made a beautiful curtain to walk through to get there. This is the only photo I could find of it and though we had the lengths of material pulled back for the party, when we went to clean up we untied them and someone took this amazing poloroid.

I don’t have any wise words for those planning their wedding now except maybe, become best friends with your printer, exploit all of your family and friend’s talents, and everything can be found second hand.