Posts Tagged ‘gifts’

a very crochet christmas

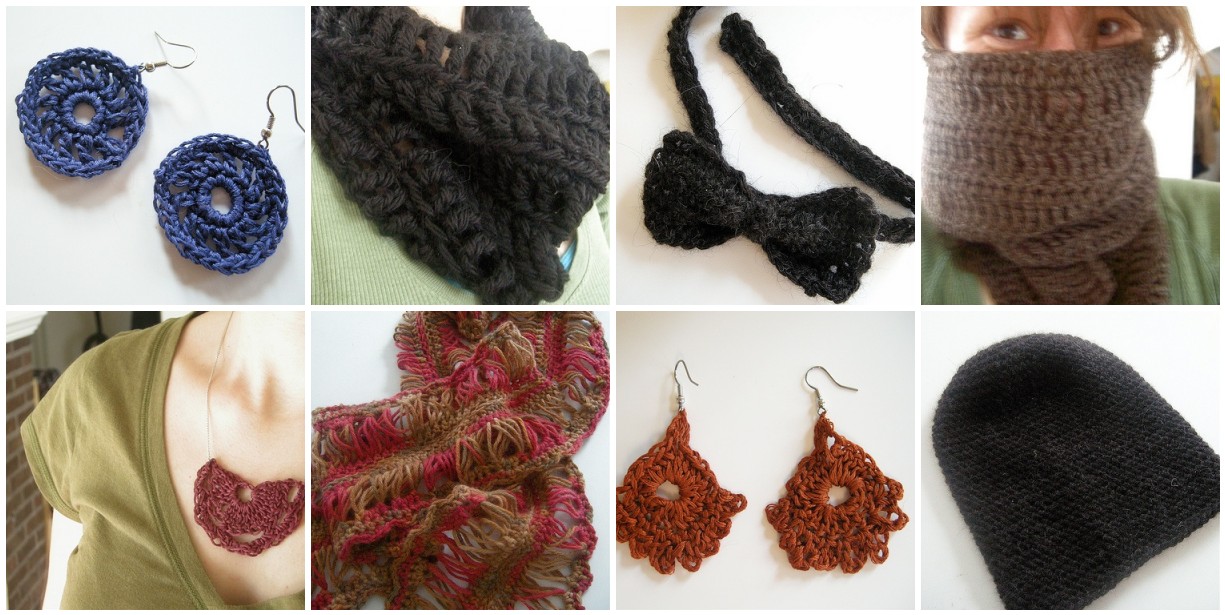
I know christmas is long gone, but I never got to show you all that I made, so just deal with it. It was indeed a very crochet christmas this year. I made earrings for all my crafty bitches (sorry, it’s just too tempting) I mean my friends from craft night. The first earring I made turned out waaaay too big, so I turned it into a necklace instead and liked it so much I made another. The other earrings worked up super quick and I think they are very pretty (and so did they, thankfully).  While I was in the jewelry making mood I crocheted a bow tie choker with some leftover alpaca I had. I thought it’d be a sassy accessory for new year’s eve, but they weren’t buying it, so I think some little boy has a new sunday tie. The alpaca was from another christmas gift I crocheted–that slouchy hat up there–for my brother in law. I think I did every single stitch wrong in the hat, but they are all wrong in the same way so it turned out. The used chunky alpaca for the black cowl (the pattern is called the the black hole cowl) and it’s so awesomely soft. If you don’t knit or crochet you should learn just because of alpaca. The last two scarves up there were for my mother-in-law and father-in-law–I’m sure you can tell which is which. The fancy one is made with the broomstick stitch, which is a super cool stitch that you actually use a broomstick for, or in my case a wrapping paper tube, and it’s made out of 100 percent cashmere (on sale) so it’s crazy soft. The one I’m peeking out from is just a quick, easy, man scarf, one I’m sure I will make again.  All the specs for all these project are on my ravelry page (you need an account to see them) and hey while you are there be my friend! I’m lonely over there on ravelry all by myself. There were two more crocheted presents and I can’t believe I didn’t get a picture of either: I made 2 moustache hats for my brother in law and his girlfriend. The moustaches were a little droopy, but otherwise they were well recieved–and worn!  So yeah, I crocheted a lot for christmas. How about you? what did you make?
how to make english toffee

This is my little bit for holidays at home.

English toffee was the first christmas candy my mom made each year.  After we were done with all the Thanksgiving leftovers, she would make a huge batch and stick it all in the freezer. And I would spend the entire month of December sneaking pieces of it thinking no one would notice. I think probably half was gone by the time Christmas rolled around! So now I make english toffee every year for Christmas and though I still eat my fair share I try to give most of it away.  The recipe below makes a smallish batch–enough for a nice gift or your own personal use–but it is easily doubled or tripled.  Don’t be intimidated by the long (winded) directions, this toffee is easy and quick to make, I just wanted them to be extra clear.

ingredients
2/3 cup butter
1/2 cup sugar
1/3 cup water
1/2 tsp salt
2/3 cup blanched slivered almonds
1/4 tsp baking soda
1/2 cup chocolate chips or 2 small chocolate bars
1/2 cup chopped pecans

you will also need
saucepan
candy thermometer
cookie sheet  (I used a small one, but the size doesn’t really matter)
a silpat if you have one, extra butter if you don’t

directions

Before you jump right in, measure out all your ingredients so they are all ready to go. If you’ve never worked with boiling sugar before (or if you are prone to accidents) keep a small bowl of ice water next to the stove in case you burn yourself. Boiling sugar is super hot, so this isn’t one for the kids. If you have a silpat (and you really should get one–they are awesome) put in on your cookie sheet and you’re good to go. If not, butter your cookie sheet like crazy.

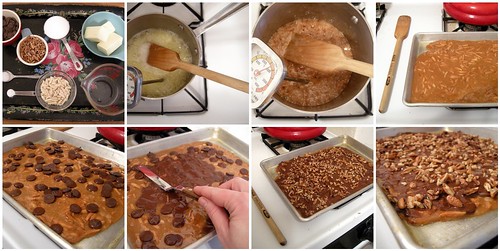
Now that everything is ready, put the sugar, butter, water and salt into your saucepan. Cook over medium heat, stirring occasionally, until it reaches 236 degrees Fahrenheit (soft ball) .  This will take a while and the chocolate chips are not there for you to snack on while you wait. The mixture will bubble up quite a bit.  It will stay around 200 degrees for longer than you think it should, but the temperature will shoot up quickly so don’t walk away. Make sure your candy thermometer is not resting on the bottom of the pan, but taking the temperature of the actual candy.

While you are waiting you can warm up the slivered almonds in the microwave. This will keep the candy’s temperature moving up instead of cooling down when you add them (but if you don’t have a microwave, you can skip it).

When the mixture is 236 degrees add the almonds. Stir constantly until it reaches 290 degrees (soft crack). The candy will turn a lovely amber shade and give off a nice, nutty smell. That when you know it’s done. I might have gone a tad too far with mine, but you’re not going to stop and take pictures while you cook.

Add the baking soda and stir.  Pour onto the prepared pan and spread it as best you can. Sprinkle the chocolate chips on top, wait a minute for them to melt and then spread them all over the top of the toffee. Sprinkle the chopped pecans on top of the chocolate and let cool.  You can speed up the cooling by popping the toffee in the freezer. When it’s completely cool break up into pieces and give away all that you don’t eat.

aprons and oven mitts

I am halfway through this handmade holiday thing–making everyone’s gift is a lot of work.  Thankfully I have a fantastic husband who lets me hide in my studio and sew for hours.  I even got myself to the post office Monday morning before it opened (there was already a line!) and a bunch of presents are on their way! The apron above is from Denyse Schmidt’s book and has an oven mitt to match. I made a few of these set for a few sets of people–aprons for the girls and oven mitts for the boys.  I think an oven mitt makes a fine man gift. I only have a few boys on my christmas list, but I have some crafty man gifts up my sleeve, which really I should be making now that I think about it…

placemats and pomanders

These are a couple of placemats I made for one of my sisters (and if my mom can hold off telling everyone she know about this blog–hi mom–she won’t know she’s getting them for christmas).   You would think placemats would be easy, hell even my husband said so, but you really do have to pay attention.  You can’t watch crappy tv while cutting them out with your dull ass rotary cutter on your cutting mat that is way to small, or none will be the same size.  This set is saved by the pretty fabric, but I made another set (for another sister) and everything went wrong: they are too big,  I used plaid fabric so you can see every flub,  I tried to make them pretty with a decorative stitch, but it make them look old fashioned, so I made some matching napkins (I never want to hem anything again) and they look ridiculously small next to the huge placemats, oh and I had to patch some fabric together because I didn’t have enough. There is always at least one project that goes like this, where everything goes wrong no matter what you try. My mom used to call these days “E.I triple T. S.” days: everything I touch turns to shit.  So here’s something nobody can screw up:

pomanders.  I did this with my daughter and her friend last week: just push cloves into oranges or clementines; for small people cut a tiny slit in the orange so the clove goes in more easily. You can tie a pretty ribbon around them and hang them on your tree or in your closet–they smell lovely.  I was going to make letters with the cloves and spell out something festive (noel was the shortest christmas sentiment I could think of) but we started eating the oranges…

Here is something you can do if you want to eat them and another if you don’t have any cloves.