Posts Tagged ‘kids’

advent activities

pompom garland and my christmas tree

Today is the first day of advent! Did you make your advent calendar yet? We are still using the string of lights advent calendar I made a few years ago. I put activities in each of the little bulbs and I love it. I write up the activity the night before (surprise your kids, not yourself!) and all the projects keep me on task for christmas.  If cookies need to be made, or christmas cards written, or gifts wrapped it’s going to happen if it is in the advent calendar–the 4 and 6 year olds will demand it!

A friend of mine (hi Ellen!) asked me to write up a little list of activities she could use, so here they are! I divided them into effort needed, because sometimes you really need to drink some (spiked) eggnog while the kids watch a movie.

meringue snowmen

big projects

gingerbread mobile

little projects

hot-cocoa-mix

if it’s cold and snowy projects


snowman coloring page

phoning it in projects

  • hot chocolate with marshmallows
  • call grandma and grandpa
  • dress up like an elf/santa/wise man/christmas tree
  • dance to christmas music
  • camp out under the tree (this may or may not be an easy one)
  • color christmasy pictures–oh look I have a bunch right here
  • look at pictures from christmases past
  • I think one year I actually wrote down “eat christmas cookies” for an activity

our little christmas tree

for the whole family

  • drive around looking at chrismtas lights
  • dress up in your fanciest for dinner
  • make popcorn and watch a christmas movie
  • go see the nutcracker/christmas carol/holiday concert
  • cut down a christmas tree/ put up your christmas tree
  • decorate the tree!
  • put up lights outside
  • go for a evening walk

string of lights advent calendar

This list is my no means exhaustive. Some of these we do every year, some are new ones I’d like to try. Do you have any christmas activities or projects for advent? I’m always on the look out for good ones.

ernie shirt

ernie shirt

The littlest in the family is crazy for Ernie these days. He calls him oooo-nee, which is unbearably cute. So what the hell, why not make an ernie shirt? Dana even has a tutorial for one. I didn’t print out her pattern, but I did look at her shirt as I cut out all the felt bits.  She adds a little embroidery, which is a nice touch, but I was feeling lazy, so I just top stitched instead. Now that I think about it my kids don’t have any licensed characters on their clothes,  but the baby, well the baby always get what he wants doesn’t he?

ernie picking his nose

ernie doesn’t mind if you pick your nose

kcwc fall 2011: wrap up

kcwc collage wrap up

1. girlies in pjs  2. Hand dyed, wool jersey vest and leggings 3.  raincoat 4. fishsticks and fries austin lee romper 5. pocket shirt 6. Peasant top and repurposed skirt 7. pockets 8. crazy stripey crawler pants 9. pink sweater II 10. gypsy forest 11. elephant and elbow patches 12.  Abby jacket 13. strawberry skirt 14. raw edged raglan tee–bamboo knit 15. school days coat  16. 90 minute shirts

Another KCWC has come and gone and you have made it amazing! One little nudge and suddenly all these cute kids have  closets full of beautiful handmade clothes.  The momentum this kcwc was unreal. Usually there is about a 50/50 split between the fizzle outers and the get ‘r doners, but it seemed like everyone was getting stuff done this fall.  No reason to let that good sewing mojo go to waste. I know you have a life to get back to, but don’t forget that just a little bit early in the morning or after the kids go to bed a couple times a week adds up to a lot of finished projects!

oct kcwc sponsor collage

1. clever charlotte 2. too sweets 3. tea collection 4. charm stitch 5. crafty mamas 6. ida pearle 7. secret cake 8. sew many patterns 9. re+new by five green acres 10. vistaprint 11. little part 12. that’s me! want to be a sponsor?

I was very excited to see all the new faces this kcwc as well. You can find some great new (to you) blogs I’m sure either in the comments section of this post or from this flickr discussion.  We all need to support each other in our crafty endevors! You can continue to support your fellow sewist by subscribing to their blog (and mine right there in the sidebar)– it’s like a virtual pat on the back. A little encouragement can do a lot, just look at the kcwc flickr pool! And my amazing sponsors could use your support too. We are all in this together!

kcwc fall 2011: day one

stripey top

The first day of the kids clothes week challenge is finally here! Full disclosure: I had my sewing week a few weeks ago so I could have a garment to show you each day, but that was a little challenge to myself. Don’t feel the need to finish something everyday. One hour sewing, pattern making, or fabric cutting–it all counts. What’s important is that you do it every day. Blogging and laundry can wait a week.

stripey top back

It seems silly to be making a sleeveless top for a fall challenge, but I only had the littlest bit of this awesome stripey fabric (thanks, lil!) and I wanted so badly to make something for my daughter from it. The pattern is from Happy Homemade vol. 5, a japanese sewing book. I’ve raved about Happy Homemade vol. 2 in KCWCs past, so I thought I’d see what vol. 5 is all about. It is everything you would expect from a sequel: sort of like the original, but not as good. Still, this is an adorable top, that came together quickly and uses just a bit of fabric. So really the book isn’t without it’s merits.

edited: I get all my japanese sewing books off etsy, search for either of these titles there and you should find them.

a coat in the works

Just because I’ve done a bunch of sewing already doesn’t mean I’m not up for more. The good sewing vibes the come out of KCWC are too good to pass up. We are 300 strong and counting this time around! If you haven’t already, go over to flickr and join the elsiemarley group so you can show off your fabric piles and patterns and finished garments. While you are there check out the eager beavers who have already posted some gorgeous pictures, like these guys:

kcwc collage day on

  1.  de-stash dress
  2.  dog shirt
  3.  tula pink tunic
  4.  stripey pants


guest post: stuff n’ stay for creative play

Today’s tutorial comes from an amazing Australian seamstress, Sophie from Cirque du bebe. Sophie is new to sewing, though you would never believe it looking at the clothes she makes. They are always super hip and beautifully finished: like this hoodie and this outfit and this stylish number.  She can pick a bold print and make it look so effortless, so right. For example she pairs a crazy-glasses-wearing-man print with stripes, pastel blue, and safety orange and it’s awesome! So I knew whatever she was going to come up with for a tutorial was going to be good, but I didn’t know it was going to be this good…

** * * * * * * * * * * * * * * * * * * * * * * * * * * * * * * * * * * * * *
Hello, Sophie here from Cirque Du Bebe. Today we are going to take an ordinary kiddie shirt and transform it into ‘lift-the-flap’ clothing. Because, lets face it, those books are more fun! You will learn how to make a simple ‘stuffie’ (completely removable for washing) and watch your kids turn it into an interactive prop for creative play. You could even make a few and rotate them.


1. Get inspired. What do you think would make a fun prop? A moustache? An ice-cream? An envelope with a felt letter? Your fabric stash can be a good place to draw inspiration…do you have some stripes that scream villain or conveniently, a fabric with a ready made prop lurking in the print (see telephone). You could put something noisy inside; crinkly plastic, a bell. The cord can become part of the game too! You guys are the creatives. Go wild.

2. Gather materials, including some stuffing to fill the shape with.

3. Cut the cord and attach velcro. The cord should be long enough to reach where the prop will be used (but not long enough to go around a neck) plus an extra inch that will be fixed inside the stuffie. Cut a narrow strip of velcro (about an inch) and secure it to one end of the cord with a zig-zag stitch, going up and back several times.

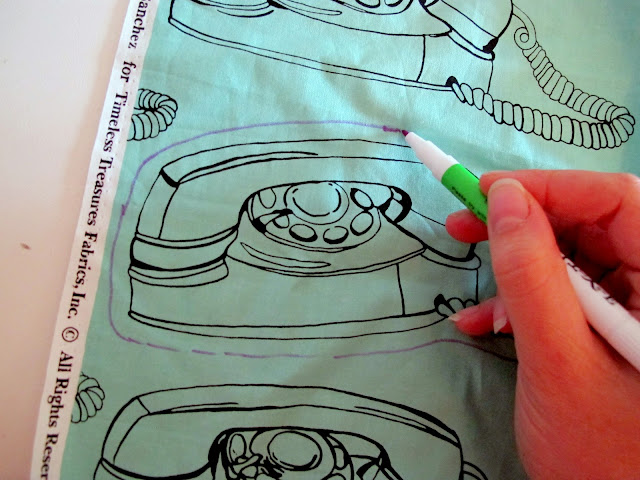
4. Draw the sewing line. This will be the perimeter of your stuffie when it is poofed up. This line should be just out from the edge of the image so you don’t lose any of it when you sew.

5. Cut the shape just outside the sewing line this time. This will become the seam allowance.

6. Flip over and re-draw your sewing line on the wrong side.

7. Cut the felt backing. Pin the fabric to your felt and cut around the shape.

8. Attach velcro to felt backing and to shirt. Sew a couple of strips of velcro to the back of the felt backing. Cover a generous area…the stuffie needs to be easy to slap on in a hurry (when you have to hang that telephone up fast). Now for the shirt. When considering where to place the complimentary velcro strips see if there is somewhere in the fabric design to disguise black or white velcro, like in stripes as above. This just makes for a slightly neater look but its not a biggie if its not possible. Pin and sew the velcro on, making sure the stuffie has plenty of area to stick to.

9. Attach cord and sew stuffie. With your fabric right side to right side (velcro facing outside), sandwich the cord between the two layers and pin in place, leaving an inch hanging outside and the rest on the inside. Shut the lid and pin around the remainder of the shape. Sew your Stuffie following the line you drew earlier, making sure the cord is still tucked inside. Leave a gap in the stitching large enough to turn stuffie back the right way.

10. Now stuff it. Stuff it real good.

11. Close the opening with small neat hand-stitching, using co-ordinating thread.

12. To add a little extra tactile goodness and give the stuffie a quilted effect, pick a couple of lines to emphasize and sew along them.

Congratulations…if you made it this far you didn’t stuff up. Sorry. Now stick that stuffie on and enjoy the entertainment.