Posts Tagged ‘quick’

to market, to market dishtowel

Edited to add: It was brought to my attention that it isn’t actually Anthropologie who makes the Primal Cuts dishtowel, but a very talented indie designer Sara Selepouchin. She sells her butcher’s diagram dishtowels and many other amazing things at her shop, girls can tell. They are beautifully designed (the coffee one is my favorite) and professionally printed–definitely not a slap dash affair like mine.


handmade may from the long thread

Ellen asked me to do a little tutorial for her handMAYde month and I was happy to oblige.  There were some fabulous tutorials for weddings, babies, and kids, but this last week is for knock offs. Being the cheapskate that I am this was the week for me. I was perusing everyone’s favorite store to knock off and saw these dishtowels:

dishtowels

Actually, last christmas I wanted to silkscreen a set of butcher diagram dishtowels for presents, but that meant learning how to silkscreen, so the idea kind of fizzled. Sadly, I still don’t know how to silkscreen. I thought maybe freezer paper stencils would work, but then the images would loose a lot of detail. Iron on paper or ink jet transfer? Well then you’d have to find and buy supplies and wrestle with your printer. I wanted a quick and dirty project. So I went downstairs to my studio, rustled up some supplies and this is what I got:

to market, to market dishtowel:

a tutorial in 3 easy steps

to market, to market dishtowel tutorial

materials:

materials

  • large embroidery hoop
  • flour sack towel
  • fine point fabric pen
  • image to trace (2 copies)

fabric pen

This is the fabric pen I used and it worked surprisingly well. I haven’t the faintest idea where I got it, but I’m guessing some crafty big box store. The flour sack towel I picked up at the grocery store a while back (3 for 5$). They shrink up a lot in the wash, so you should probably wash, dry and iron them before you start. The image might get all weird if you do it after.

tracing the image

directions:

1. fit your embroidery hoop on your towel where you want the image to go. Make sure to put the hoop on upside down–so the towel is right side up, but flat on the table.

image and copy

2. Then just trace the image. I found it handy to have another copy of my picture  I could refer to as I traced. The flour sack towel is easy enough to see through, but it’s nice to know exactly what the image should look like without picking the towel up to peek under it.

3. Heat set the image with your iron. And that’s it! Quick and dirty–and pretty stylish too.

to market dishtowel hanging up


from the north country: noodlehead

Hi there! It’s me, Anna from noodlehead.  If you have some time to kill today, feel free to stop by and say hi or check out my tutorials and patterns.  I also want to say a huge thanks to Meg for having me over.  I’ve been a long time admirer of Elsie Marley and am super honored that Meg asked me to stop by with a fun little project!

It’s a sweet and simple project you can create in time for valentines day.  This would even be a great project for a beginner or for a child who’s fairly comfortable using a sewing machine.

I thought of these pillows one day after I saw some of my vintage hankies.  Their colors were perfect for valentines day and I thought they would add a little bit of character to an empty chair or sofa.  My mom had given me a few of the hankies and I had collected a few from local estate sales.  If you’re not sure where to get vintage hankies, I suggest looking at estate sales, etsy, or ebay.  They’re usually in pretty good condition and will be durable enough to add to a pillow  After all, they were originally intended for nose blowing!
Now I’m sure there are some enthusiasts who would never do this to a prized vintage item, but for me I’d rather have them out on display where we can enjoy them more, instead of stashed in a drawer somewhere.
Let’s get started!

Materials:

  • 1/2 yard linen or base fabric for making the pillow cover
  • 1 vintage hankie (wash, iron, starch)
  • 1/2 yard heat n bond lite (available at Joanns, even pre-packaged at walmart)
  • thread, sewing machine, pins, etc.
I’ll give measurements for both a 16″ pillow form, but of course feel free to adjust these as needed for your particular hankie/pillow form.

Cutting the pieces:

  • top: 16″ x 16″
  • for envelope back: cut one piece 16″ tall by 14″ wide, and another 16″ tall by 11″ wide
Attaching hankie:
Apply heat n bond lite to the hankie using manufacturers directions.  Fuse hankie to pillow cover top, centering hankie.
The next step can be potentially tricky, but you’ll need to sew the hankie down to the pillow cover top as close to the hankie’s edge as possible.
Depending on how your particular hankie is shaped/hemmed, you might have to take it really slow and lift the presser foot and turn as you go.  You could alternately used heat n bond ultra (which requires no sewing to ensure the quality of the bond), however it will make the pillow more stiff, so I’ll just leave that up to you!
Finishing the pillow:
Next you’ll want to hem the edges of the envelope back opening.  Take one piece of envelope back and press the long side over by 1/2″ towards the WRONG side of the fabric and again by another 1/2″.
Sew close to folded edge.  Do this for both envelope back pieces.
Then place the pillow cover top facing RIGHT side up, on top of that layer the larger back piece RIGHT side down on top, aligning raw edges.  Then place the smaller envelope back piece over that, also RIGHT side down.  Pin.  Sew around entire perimeter using a 1/2″ seam allowance.
Serge or use a zig zag stitch around edges to finish them off so they don’t fray in the wash, clip corners.  Press.  Insert pillow form and enjoy!

a rainbow birthday party: part one

Almost every party we’ve been to recently has had a pinata, so of course my daughter asked (and asked and asked) to have one at her birthday party. But those pinatas are impenetrable! After about 10 rounds of the kids taking turns whacking the thing (and after one burly dad tries, and fails) someone has to get the scissors or and ax or some sharp object and pry the damn thing open, by which time the kids have lost their minds waiting for the candy. So I thought I’d make my own, which took a lot more time than I bargained for, but a lot less tissue paper than I imagined. And after everyone got three turns, one kid smacked it to pieces.

With all the leftover tissue paper I made some martha poofs for above the picnic table. I forgot how easy these are and how pretty. My daughter gasped when I she saw them!

Inside, we hung rainbows and clouds from the ceiling. We were going to make raindrops too, but somehow forgot. Both projects were very simple and clever and the kids helped with both. The rainbows are made by cutting paper into progressively shorter strips and then stapling them together at the ends. I found the directions for the paper rainbows via the crafty crow.

The clouds are so awesome I can’t get over it. They are made by winding a piece of wire into a corkscrew shape and then twisting into a floof of polyfil. Ingenious. You can find the directions to make your own clouds on ohdeeoh.  These will definitely stick around for a while, maybe even become the long overdue mobile above the baby’s bed.

Enough for now, I’ll be back tomorrow with rainbow food and rainbow favors!

rainbow birthday party: part two


kcwc: halloween costume inspiration and tutorials

My mother didn’t care for halloween, to put it mildly, and really I don’t blame her: whining for expensive costumes that last for one night, demanding different ones at the last minute, coming home with a pillowcase full of candy and then belly aches and sugar melt downs for days.  I can feel the hate for halloween in my genes, but I try to fight it. As long as I treat halloween costumes as quick and dirty projects then I’m not mad when they are rejected or ripped or ugly or whatever.  A lot of people love halloween though and thank goodness because they make awesome costumes for us to ogle.

amazing and creative handmade halloween costumes


1. Baby Woodpecker, 2. Devil(ed) Egg, 3. Jedi Robe, 4. lace crown, 5. Star wars birthday courtesy of oliver and s and ottobre, 6. angry/suprised owl, 7. Infant Elvis Costume, 8. week 9.2, 9. in lieu

This is just a small selection of the fantastic tutorials out there for kids’ halloween costumes. The creativity and the construction of these costumes blows me away. If you know of any good tutorials (or have made some yourself) please leave a comment linking to it.  And get ready because the challenge starts on Monday!

hilarious halloween costume tutorials

1. strong man 2. freezer paper skeleton costume 3. sock monkey 4. pukka costume 5. care bear costume 6. frankenstein 7. happy mutant three armed baby 8. last minute kids owl costume 9. daisy costume

tin foil noodles

The other day we wrapped some tin foil in noodles. I thought they made for a pretty stylish necklace.

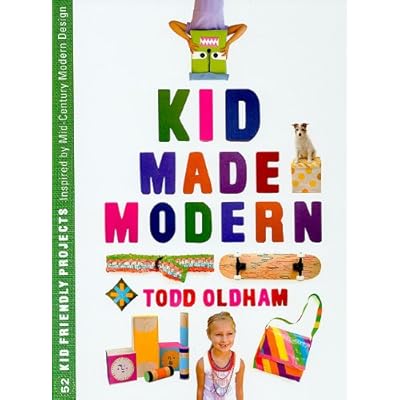
The project came from Todd Oldham’s awesome book Kid Made Modern. His first book, Handmade Made Modern, was decent, but this one is super fantstic. I think it’s aimed at kids around the ages 7-12, but there are some projects little ones can do and I would have loved it as a teenager–really even if you don’t have kids there are some super styish ideas you can steal.

In the book, Oldham takes mid century designers–Isamu Noguchi, Marimekko, Alexander Calder, Paul Rand, Charles and Rae Eames and so many more–tells you a little about them and their art and then presents a couple projects inspired by their work. The projects are organized by material–many of them recycled–or technique.   The printing, cardboard, tape and dye sections are some of my favorites, but I was taken by most of the projects.

I  didn’t mean for this to become a full on book review (I was just going to tell you about the noodles) but I think this is a fantastic craft book that is well put together and well thought out. And definitely not only for kids. If you feel like wrapping noodles in tin foil–you really don’t need the book for this project– but I would dab a little bit of glue on the noodle before you roll it up. We didn’t and I kept finding bits of tin foil around the house for the rest of the week.

Oh and look there is a kid made modern website with some extra projects and little videos, check it out!