Posts Tagged ‘shirt’

guest post: stuff n’ stay for creative play

Today’s tutorial comes from an amazing Australian seamstress, Sophie from Cirque du bebe. Sophie is new to sewing, though you would never believe it looking at the clothes she makes. They are always super hip and beautifully finished: like this hoodie and this outfit and this stylish number.  She can pick a bold print and make it look so effortless, so right. For example she pairs a crazy-glasses-wearing-man print with stripes, pastel blue, and safety orange and it’s awesome! So I knew whatever she was going to come up with for a tutorial was going to be good, but I didn’t know it was going to be this good…

** * * * * * * * * * * * * * * * * * * * * * * * * * * * * * * * * * * * * *
Hello, Sophie here from Cirque Du Bebe. Today we are going to take an ordinary kiddie shirt and transform it into ‘lift-the-flap’ clothing. Because, lets face it, those books are more fun! You will learn how to make a simple ‘stuffie’ (completely removable for washing) and watch your kids turn it into an interactive prop for creative play. You could even make a few and rotate them.


1. Get inspired. What do you think would make a fun prop? A moustache? An ice-cream? An envelope with a felt letter? Your fabric stash can be a good place to draw inspiration…do you have some stripes that scream villain or conveniently, a fabric with a ready made prop lurking in the print (see telephone). You could put something noisy inside; crinkly plastic, a bell. The cord can become part of the game too! You guys are the creatives. Go wild.

2. Gather materials, including some stuffing to fill the shape with.

3. Cut the cord and attach velcro. The cord should be long enough to reach where the prop will be used (but not long enough to go around a neck) plus an extra inch that will be fixed inside the stuffie. Cut a narrow strip of velcro (about an inch) and secure it to one end of the cord with a zig-zag stitch, going up and back several times.

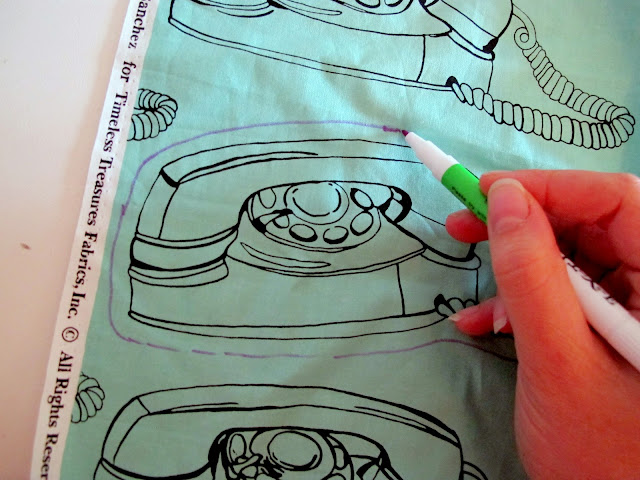
4. Draw the sewing line. This will be the perimeter of your stuffie when it is poofed up. This line should be just out from the edge of the image so you don’t lose any of it when you sew.

5. Cut the shape just outside the sewing line this time. This will become the seam allowance.

6. Flip over and re-draw your sewing line on the wrong side.

7. Cut the felt backing. Pin the fabric to your felt and cut around the shape.

8. Attach velcro to felt backing and to shirt. Sew a couple of strips of velcro to the back of the felt backing. Cover a generous area…the stuffie needs to be easy to slap on in a hurry (when you have to hang that telephone up fast). Now for the shirt. When considering where to place the complimentary velcro strips see if there is somewhere in the fabric design to disguise black or white velcro, like in stripes as above. This just makes for a slightly neater look but its not a biggie if its not possible. Pin and sew the velcro on, making sure the stuffie has plenty of area to stick to.

9. Attach cord and sew stuffie. With your fabric right side to right side (velcro facing outside), sandwich the cord between the two layers and pin in place, leaving an inch hanging outside and the rest on the inside. Shut the lid and pin around the remainder of the shape. Sew your Stuffie following the line you drew earlier, making sure the cord is still tucked inside. Leave a gap in the stitching large enough to turn stuffie back the right way.

10. Now stuff it. Stuff it real good.

11. Close the opening with small neat hand-stitching, using co-ordinating thread.

12. To add a little extra tactile goodness and give the stuffie a quilted effect, pick a couple of lines to emphasize and sew along them.

Congratulations…if you made it this far you didn’t stuff up. Sorry. Now stick that stuffie on and enjoy the entertainment.

guest post: tutorial for a cuffy outfit

I want to welcome Sophie from Roubidou as our first guest poster this week! I have been watching her sew tiny, beautiful clothes all through her pregnancy: quilted jackets and fuzzy vests and amazing ensembles! Even though she was very, very pregnant, she agreed to write up a tutorial for us. And wow, what a tutorial it is! A cuff is a lovely detail and now you can put it on a shirt, a jacket, a pair of pants, or all three. After you’ve finished reading the tutorial she made, go have a look at the lovely baby she just made! Congratulations Sophie!
* * * * * * * * * * * * * * * * * * * * * * * * * * * * * * * * * * * * * *

Hello dear Elsie Marley readers,

When Meg asked me to do a little tutorial for KCWC I was pleased as punch not only for an opportunity to be a guest on one of my favourite blogs but also to be part of this autumn’s sewing frolic after all (our daughter is supposed to arrive on the 10th). I sewed the outfit to introduce three slightly different types of cuffs and hope you can follow the instructions without too much effort. I’m a self-trained dilettante so the tutorial below is merely what worked for me.

Happy KCWC,

Sophie

* * * * * * * * * * * * * * * * * * * * * * * * * * * * * * * * * * * * * * *

Shirt:

1. Sew the shirt as indicated by your pattern ignoring the instructions for the sleeve finish. Look at the given seam allowance and the sleeve finish method of the pattern, calculate the length of your cuff plus seam allowance to determine how much you’ll shorten the sleeve before adding the cuff and placket. To save fabric you could do this before cutting the fabric. If you have your little client ready and willing have her/him put on the garment to tailor the sleeves according to his/her measurement.

2. Make a pattern for you placket and cut out the placket twice (you’ll want mirroring plackets unlike the ones in the photo).

3. Place the placket with its ride side onto the wrong side of the sleeve and sew a little rectangle. Slash through the placket and sleeve down centre right between the stitches and carefully clip to the corners of the rectangle.

4. Turn the placket to the right side of the fabric and press. Now it’s likely to become a bit finicky. I very much prefer sewing for kids since it is so much quicker, pieces are easier to handle and you need less fabric. But sewing this placket, especially for a size 2 shirt, I wished I was sewing an adult sized shirt. To help you through this fabric origami it might be good idea to have a ‘real’ shirt with a placket lying next to you for visual guidance.

5. Fold back the long edge of the shorter side of the placket and pin in place. Then sew the folded edge in place stopping at the top of the gap. Tie the thread ends securely on the wrong side.

6. Next, fold the other side of the placket across the shorter side and press under the long edge. Fold back so that the pressed-under edge is on the sewing line and pin in place. Now, fold under the top pointed end,and press. Sew the long folded edge and make sure the underside of the placket is not caught in the stitching. Stitch an X at the end of the placket. Finish by tying the thread ends on the wrong side.

7. Now, gather the sleeve, stitching along the sleeve line with the longest stitch available on your sewing machine. Pull on the threads to manipulate the sleeve.

8. Cut out the cuff in the desired size. I used a one-piece cuff cut from the fabric in one piece and applied fusible interfacing to the half of the cuff that will be the upper cuff. Fold the seam of the non-interfaced side and press. Next sew the cuff onto the sleeve, right side to right side and trim the seam allowance. It’s important that you have an overlap as large as your seam allowance on both sides.

9. Fold and press the cuff to itself, right side to right side, so the folded side of the cuff comes to the sleeve-to-cuff seamline. Sew the ends in line with the two openings, cut the seam allowance, and press the seams open.

10. Trim, turn and press the cuff to the right side. I sewed the folded under cuff in place by machine, but if you want an invisible finish for your could,  hand stitch the folded edge on the inside with a blind-stitch or a slip-stitch.

11. Make a buttonhole on the upper side of the cuff and sew a button on the underside of the cuff. Repeat for the other sleeve.

Jacket:

1. Sew your jacket bearing the same alterations in mind as with the shirt.

2. Now on to the band cuff. Cut the cuff in the desired size, you’ll have two pieces of different fabric per cuff. Since the outside fabric is already thick I didn’t use fusible interfacing, depending on your fabric you might want to apply interfacing to the upper cuff. Pin the two pieces together, right sides facing, and turn under a seam allowance on the under cuff and press. Stitch the lower edge together. Trim and press open the cuff. 


3. Then sew the short side ends together, trim and press again. 

4. If you want to gather the sleeve before sewing on the cuff, do so now. Then sew the sleeve to the upper cuff, right sides facing. Trim and grade the seam. 

5. Press the seam allowance towards the cuff. Turn the cuff inside along the foldline, wrong sides facing. On the inside of the sleeve sew the under cuff in place either by machine or handstitch.

6. Repeat for the other sleeve and that’s it. 

Pants:

1. This cuff is sewn very similar to the shirt cuff. The main construction difference is that this is a lapped cuff which is used for bound or faced openings. I didn’t use any of these openings since I lined the pants and had my raw seams of the opening sandwiched between the lining and the main fabric. With a lapped cuff you’ll have to sew the cuff onto the knee sleeve with an overlap where the button will be. Sew your pants bearing the same alterations in mind as with the shirt

2. Now to the cuff. Start by sewing a line of piping (with your zipper foot) long enough for two sleeve cuffs. Then cut the cuffs in the desired size (i simply used a cereal bowl to trace the round edges). You’ll need four pieces altogether, I used the same fabric inside as outside in order not to distract from the piping. Pin the piping to the right side of one sleeve cuff. Stitch close to the stitching line on the piping, sewing with your zipper foot.

3. Turn under a seam allowance on the under cuff and press. Place the under cuff over the piping, right sides facing an sew the outer line of the cuff close to the previous stitch and the piping again with your zipper foot. Trim, turn and press the cuff.

4. Now attach the cuff to the knee sleeve as you did with the shirt but leave a seam allowance on one side and an overlap (long enough for your button) on the other side. Sew the cuff to the knee sleeve as you did with the shirt. Fold and press the cuff to itself, right side to right side, so the folded side of the cuff comes to the knee-sleeve-to-cuff seamline. Sew the shirt end in line with the opening and trim. Sew the overlap end along from the knee-sleeve to-cuff-seamline and then down to the cuff. Clip the corners and press the seams open. Push to the right side and finish the edge of the under cuff either by hand or machine.

5. Make a buttonhole on the upper side of the cuff and sew a button on the underside of the cuff. Repeat for the other knee sleeve.

And ready is a cuffy outfit.

shirred check top

girl's check shirt made from men's shirt

Here is a little shirred top I made for my daughter from an old men’s shirt. When I started I was trying to make something more like this, but the yoke was a leeetle too tight. Luckily there was just enough length to cut it off and try something new.

That damn elastic thread everyone raves about seemed like the best bet for actually coming out with a wearable top in the end. I’ve tried it before, but there are so many conflicting explainations on how to use it–wind it loose, wind it tight, wind it not too loose and not too tight (that one is particularly helpful, thank you), pull it to gather, don’t pull it, iron it, steam it. Whatever. I already screwed up the shirt once, so I didn’t have much to lose by screwing it up again.

But hey! it’s not so bad.  I have no idea how I wound the bobbin (not too loose and not too tight–sorry) but it worked well enough. Definintly of the homemade varitey.  She likes it, but elastic thread is not all that pleasant against the skin–anyone have any ideas for lining shirring? Or have any horror stories about elastic thread?

stripey shirt

I’m ashamed to say how long ago I started this shirt. I think it was supposed to be for Rae’s spring top week, which was in April. Well, it is very much summer here now and it’s finally done. Too late for one contest, but just in time for another. ha! The shirt started out as this ridiculously large muumuu swim suit cover up from h&m. I had been looking for a stripey shirt for summer, but couldn’t find one that was just right.  I saw this gigantic number and liked the stripes, so I spent all of 5 bucks for it.  I thought with that much fabric I could probably screw up and still come out with a shirt.

I used a 70s knit shirt pattern I had squirreled away and it worked out ok. I lent the pattern to a friend so I can’t show you the pattern picture, but it’s a v-neck, raglan sleeve shirt with a little bit of gathers at the point of the V.  I’ve had shirts like this before and they have always been flattering.  I didn’t gather it as much as the pattern wanted me too because it made the V neck too high up and I wanted a  deeper V, so next time I’ll try to figure out how to make the pattern do both those things at the same time. It also came out a little boxy and a little short, but I think I can fix that next time.

I have no idea how the pattern wanted me to finish the neckline, which is why this shirt has been sitting around unfinished since April. Finally I just slapped a half ass binding on it and called it done. And I’m happy to say I actually wear the sucker. Out of the house even.

hot dog shirt

FxCam_1270055329656

Before easter we went to a fantastic birthday party for a 2 year old. A two year old who loves hot dogs and balloons more than anything, so of course the party had lots of balloons and hot dogs. awesome!  I had plans to make this shirt weeks before the party, but of course I ended up doing it the night before.  I was inspired by this picture I found on flickr:

I just used freezer paper and paint and it was done. I tried to make the bun a little less 2 dimensional, but I’m no artist so it only kind of worked. It’s good to know that freezer paper prints don’t have to just be blocks of color–you can art it up all you want.

FxCam_1270055348614

A few people have emailed me to ask what the hell is freezer paper anyway. And because I’m lazy and waaay behind on replying to email (sorry) I will just tell you all here: it’s like butcher paper, where one side is paper and the other is plasticy. The plasticy side can be ironed onto fabric and then peeled off making it perfect for a ton of projects. I even use it to make patterns so I can just iron the patterns on and skip pinning. The kind I have is made by Reynolds and it’s right next to the tin foil in my grocery store.  There is a whole group on flickr devoted to freezer paper stencils and there are some pretty awesome ones there.