Posts Tagged ‘tutorial’

woodland ornaments

It’s Handmade Holidays all month long at Sew Mama Sew (if you didn’t know already).  They, so kindly, asked me to be on their board and come up with a few ideas for their amazing blog.  After crossing out many bad ideas, I came up with these little plush ornaments. They are simple to make and you can find all the tutorials here: woodland ornament tutorials.  If you make one, be sure to show it off on the Handmade Holidays flickr pool! Only 33 days until Christmas.

post office bag tutorial
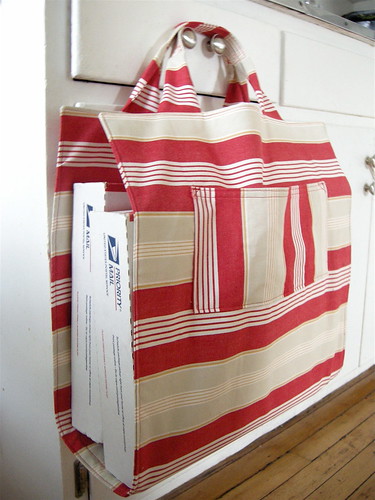
Now that I have an etsy shop I find myself at the post office more than ever. Along with all the packages I have to carry I have a stroller to push and a toddler’s hand to hold.  The packages are always weird sizes and never seem to fit in a paper bag, so I came up this handy dandy post office bag. It’s just a long piece of fabric with some handles and pockets, but it works like a charm. The pockets are sized to fit a long envelope and there is one on each side. I put my receipts, my stamps, and my custom forms in the pockets so they don’t get lost in the bottom of my purse or the diaper bag (which they usually do).  I figured since there are so many etsy sellers there must be a lot of you who have this package transport problem (kids or no kids) and so I wrote a simple tutorial for this super easy bag. It shouldn’t take more than a couple hours from start to finish. And if you make one drop me a line so I can see!

post office bag tutorial
materials

  • 1 1/2 yards heavy duty fabric (I used some home dec fabric I had on hand, but canvas, denim, corduroy, or even twill would work)
  • a little more than 1/2 yard interfacing (somewhat stiff)
  • thread to match

directions

CUT:

  1. two 18″ X 40″ pieces of fabric
  2. one 18″ X 40″ pieces of interfacing
  3. four 3″ X 18″ pieces of fabric for the handles
  4. two 7″ X 12″ pieces of fabric for the pockets

SEW:

  1. fuse or sew the interfacing to the wrong side of one of the large pieces (this will be the lining)
  2. with wrong sides facing sew each of the two handles together
  3. turn out and press
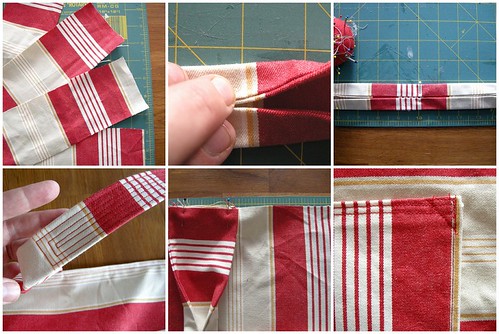
  4. find the middle of one of the handles and fold the long sides in to meet and pin
  5. continue the fold 4″ out from the middle on either side and pin
  6. do this to the other handle and press both
  7. your handles should have a 8″ folded part in the middle and the ends will still lie flat
  8. sew concentric rectangles on the folded area to anchor it down
  9. stop to admire your work
  10. take the two pocket pieces and fold the short sides in 1/4″ and press and 1/4″ again and press
  11. do the same on the top and bottom
  12. sew the across the top of both the pockets
  13. pin the pockets 5″ inches from each short side of the outside piece.
  14. sew the pocket on and reinforce the top two corners (with an X or a triangle)
  15. pin the handles to end of the lining, right sides facing (you should see the fold line)
  16. place the outside piece on top of the lining right sides facing (pocket should be down) and sew all
  17. around with a 1/2″ seam, leaving an opening for turning out
  18. trim the seams, turn out and press
  19. topstitch all around
  20. create a bottom by stitching large concentric rectangles equidistant from both the handles
  21. that’s it! you’re done! off to the post office…
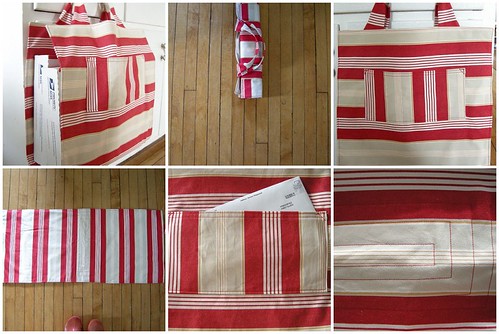
To see any of these pictures in more detail, please go to my flickr site. If there are any problems with this tutorial, please tell me . It turns out it’s much harder to explain how to make this bag than it is to actually make it!

tin can cover

This project is from an old issue of Cotton Friend, a japanese magazine that my husband brought back for me from Singapore.  These are incredibly handy and I have many more in the works: for all the crap little things in my studio and all the markers, crayons and glue sticks that are under the couch.  I thought you would like to make some too, so I whipped up a tutorial. Here you go:

Materials:
28 oz. tin can (if you have a different size can, just measure the height and circumference, add seam allowances, and the rest is the same)
linen, or other fabric
lining fabric
embroidery floss
glue (I used rubber cement, but plain white glue should do just fine)

Directions:

Wash your tin can and take off the paper.  Cut two 13″ X 4.75″ rectangles–one from linen and one from the lining fabric–and one 13″ X 1.5″ strip of linen.  Embroider the design of your choice on the fabric or leave it plain if you like. Place the two large rectangles together right sides facing, and sew around using a 1/4 inch seam allowance.  Leave a 2 inch opening in the middle of one of the short sides for turning out.  Clip the corners, turn and press (I like to press it so a little of the lining shows).  Sew the opening closed.  Fold the strip of fabric in half the long way and press.  All the way along one side clip almost up to the fold.  Glue the unclipped side to the inside of the tin can, then glue the outside.  Wrap the finished piece around the can and sew shut (I like my stitches to show, but you could of course use an invisible stitch).

I was planning on having a pdf file with embroidery designs you could download, but I’m not having much luck with that at the moment.  Until I figure it out here are pictures of the designs you can print out and use (you will probably have to resize them a bit). If you want to see these or any of the instructional photos more clearly, click over to my flickr site.

Edited to add: please click here and you can download both sets of designs for your own stylish, embroidered tin can cover.

drop me a line if you make one!

pattern for a half eaten gingerbread man

Only six days until christmas and amazingly there is no furious sewing in this house. Just one more gift to make and then we’re off to Grandma’s house. There are always a couple people I forget and they are always the ones ready with a gift for me. So I thought I’d make a few ornaments to keep in my bag for those awful, awkward moments. I’m sure there are people like that in your life too: the weird cousin, the super smiley coworker. I thought I’d pass on a pattern for a gingerbread man ornament that can be whipped up quickly just in case you forgot someone. Click here to download the gingerbread man pattern and instructions. I included some pictures with the instructions below as well. If you make one let me know!

materials
brown or tan wool felt
a tiny bit of white felt too
some stuffing (polyfil, etc.)
red, white, and black embroidery thread
white mini rickrack
fray check
two red buttons
glue stick

directions

1. cut out template and pin to felt. Cut out one gingerbread man out of felt.

2. for the eyes cut two small circles out of the white felt and attach them to the gingerbread man with one black french knot each. With a backstitch, sew a small circle for the mouth. Sew buttons on with white embroidery thread–to make them look like candies, sew from the button holes to the outside edge of the button. Cut pieces of mini rickrack for trim on two arms and the leg, dab all the ends with fray check, and use the glue stick to tack them down.

3. cut a rectangle as big as your gingerbread man out of felt. Pin your decorated man to this rectangle. Make a loop of rickrack and tuck it in between the layers on your gingerbread man’s head (to hang him from later). Stitch by machine or by hand from A to B (the long way) 1/8inch from the edge. Be sure to catch all the rickrack as you stitch.

4. cut off the extra felt.

5. stuff the little man lightly and sew up the opening.

6. hang him up or give him away!

making leaves

Today is Monday, so my daughter and I had a little crafty time together.  I wanted to try making a collage with contact paper for a while now.  She’s only just 2 and she hasn’t quite mastered the glue stick yet. We gathered our supplies: contact paper, tissue paper, leaves and twigs we picked up on a walk, and fabric scraps.  We slapped everything down –well, I arranged mine–on the sticky side and then put another piece of contact paper (sticky side down) on top of it all. It looked like this:

Then I cut out leaves and taped them to the window.  I think this is a good craft for the toddler set.  Tearing paper and sticky things are pretty exciting to my daughter so this project actually held her interest for a while.  Contact paper isn’t all that sticky, so the tissue paper worked best.  But if you are crazy like me and save the tiniest scrap, well they work too and I think thread would look nice.  Leaves work if they’re pressed (ours weren’t) and you get leaves in leaves at the end, which is exciting only to me.  You could, of course, cut any shape out: turkeys, christmas trees, vacuum cleaners, whatever.  When it came time for cutting, my daughter was already on to other things, but 10 quiet minutes is pretty huge.