guest post: stuff n’ stay for creative play
October 7th, 2011
Today’s tutorial comes from an amazing Australian seamstress, Sophie from Cirque du bebe. Sophie is new to sewing, though you would never believe it looking at the clothes she makes. They are always super hip and beautifully finished: like this hoodie and this outfit and this stylish number. She can pick a bold print and make it look so effortless, so right. For example she pairs a crazy-glasses-wearing-man print with stripes, pastel blue, and safety orange and it’s awesome! So I knew whatever she was going to come up with for a tutorial was going to be good, but I didn’t know it was going to be this good…
** * * * * * * * * * * * * * * * * * * * * * * * * * * * * * * * * * * * * *
Hello, Sophie here from Cirque Du Bebe. Today we are going to take an ordinary kiddie shirt and transform it into ‘lift-the-flap’ clothing. Because, lets face it, those books are more fun! You will learn how to make a simple ‘stuffie’ (completely removable for washing) and watch your kids turn it into an interactive prop for creative play. You could even make a few and rotate them.
1. Get inspired. What do you think would make a fun prop? A moustache? An ice-cream? An envelope with a felt letter? Your fabric stash can be a good place to draw inspiration…do you have some stripes that scream villain or conveniently, a fabric with a ready made prop lurking in the print (see telephone). You could put something noisy inside; crinkly plastic, a bell. The cord can become part of the game too! You guys are the creatives. Go wild.
2. Gather materials, including some stuffing to fill the shape with.
3. Cut the cord and attach velcro. The cord should be long enough to reach where the prop will be used (but not long enough to go around a neck) plus an extra inch that will be fixed inside the stuffie. Cut a narrow strip of velcro (about an inch) and secure it to one end of the cord with a zig-zag stitch, going up and back several times.
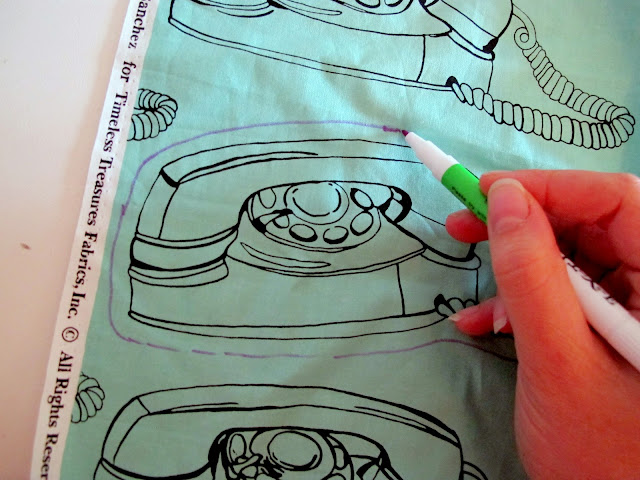
4. Draw the sewing line. This will be the perimeter of your stuffie when it is poofed up. This line should be just out from the edge of the image so you don’t lose any of it when you sew.
5. Cut the shape just outside the sewing line this time. This will become the seam allowance.
6. Flip over and re-draw your sewing line on the wrong side.
7. Cut the felt backing. Pin the fabric to your felt and cut around the shape.

9. Attach cord and sew stuffie. With your fabric right side to right side (velcro facing outside), sandwich the cord between the two layers and pin in place, leaving an inch hanging outside and the rest on the inside. Shut the lid and pin around the remainder of the shape. Sew your Stuffie following the line you drew earlier, making sure the cord is still tucked inside. Leave a gap in the stitching large enough to turn stuffie back the right way.
10. Now stuff it. Stuff it real good.
11. Close the opening with small neat hand-stitching, using co-ordinating thread.
12. To add a little extra tactile goodness and give the stuffie a quilted effect, pick a couple of lines to emphasize and sew along them.


Wow, Sophie, super cute, what a great idea! I can’t wait to see what you make next week! I loved your hoodies last spring and always find your finished products so inspiring :)
That is so cute and I have that fabric! Been wondering what to do with it :)
are you kidding me?? that is soooo cool. just like all of sophie’s stuff!
Such a cute idea!!
Wow! That is so creative!
Thanks for all the inspiration! I am really looking forward to the challenge next week.
THis might be the coolest thing I’ve seen this year. Wow. I might really have to try to make some kids clothes for a change now…
Oh my gosh… what a super cute idea!
sophie, this is awesome! sooo fun!
ok, this is just hilarious! I love it!!
Love this! What a clever idea! :)
Fabulous!! My boys would love this.
Beyond awesome.
that is ridiculously cute, ingenious!
Love it!!!
This is such a unique, fun project. And I love all the different ideas. So many different applications…super inspiring thank you!
Gasp! That is too too cute! Love it. Thanks!
This is AWESOME!!!!
acupofsparkle.blogspot.com
Brilliant!! So sweet! Thank you for sharing this wonderful idea!
[…] pretty sure the squirrel is what sold her on the costume. It’s attached with velcro (a la Sophie’s super cool interactive stuffie shirt) so it can scamper around in the branches and collect acorns. Lila’s into […]