Posts Tagged ‘simple’

summer journal: finish the picture

Super simple and super fun project. Cut out a square of a picture from a magazine or newspaper. Next, glue it to a piece of paper. Then finish the drawing. See what strange and hilarious things come out of it! Title of my children’s works appear below the pictures. (please excuse the crummy phone photos.)

finish the picture project

Alligator Loves His New Pants

finish the picture project

Two people sitting on a couch with their heads on fire and Monster 

finish the picture project

Pretty Darn Cute Cat

finish the picture project

Two Donuts

Have you done any good projects lately?


painterly skirt tutorial

For my contribution to Skirt Week 2012, I made this little tutorial for turning an old, rather boring skirt into something a bit more interesting. Sometimes you don’t need to make a new skirt, but you need to liberate one from the back of your closet. I had planned on doing a tutorial for a button placket, but then I saw this picture and could not stop thinking about it:

These pants are from a shop in New York that specializes in super awesome Japanese children’s clothes. The idea is so simple and so effortlessly cool that I had to steal it.

painterly skirt tutorial

painterly skirt

materials:

  • 1 unloved skirt
  • a bit of cardboard or freezer paper
  • paint of your choice, fabric or acrylic or even house paint*
  • stamps
  • very small paint brush

painterly skirt materials


directions:

1. The first thing I did was carve some starts out of an old eraser. If you’ve never done this before it may sound hard, but I assure you it is not. I carved two stamps from a big eraser and two from the tiny erasers on a pair of new pencils. It took me all of 10 minutes. There are many good tutorials for carving stamps from erasers out there (this one and this one for example). The stamp you make should be quite small, so stick to a simple shape–stars work well!

starting the stars

2. Put a piece of cardboard under where you will be stamping, or you can iron a bit of freezer paper to the back. You need something under your design, so the paint doesn’t bleed through to the other side.

3. Start stamping! You can be as fussy or as messy as you want. The look we are going for is paint wiped on the side of your skirt, so there aren’t too many rules you have to follow. It looks nice if the stamps are concentrated a bit in one area and then fade out towards the edges.

stars painted

3. After you have stamped to your heart’s content, take a very small paintbrush and go over some of the stamps with more paint. This will make some of the stars stand out better and give the design a little more dimension.

4. Let the paint dry and go over it with an iron to set it.  Waalaa! a new skirt! One that will be loved and worn again!

before after painterly skirt

*a note on paint: I don’t paint on my clothes very often, but when I do (like here and here) I like to use a product called fabric meduim. You mix the meduim with any acrylic paint and it makes it into a fabric paint. A good friend of mine turned me on to it. Another good friend told me to get out of the not-so-great craft acrylic paint aisle and go to the actually-an-artist acrylic paint aisle: the colors and the quality are better.

painterly skirt after


from the north country: noodlehead

Hi there! It’s me, Anna from noodlehead.  If you have some time to kill today, feel free to stop by and say hi or check out my tutorials and patterns.  I also want to say a huge thanks to Meg for having me over.  I’ve been a long time admirer of Elsie Marley and am super honored that Meg asked me to stop by with a fun little project!

It’s a sweet and simple project you can create in time for valentines day.  This would even be a great project for a beginner or for a child who’s fairly comfortable using a sewing machine.

I thought of these pillows one day after I saw some of my vintage hankies.  Their colors were perfect for valentines day and I thought they would add a little bit of character to an empty chair or sofa.  My mom had given me a few of the hankies and I had collected a few from local estate sales.  If you’re not sure where to get vintage hankies, I suggest looking at estate sales, etsy, or ebay.  They’re usually in pretty good condition and will be durable enough to add to a pillow  After all, they were originally intended for nose blowing!
Now I’m sure there are some enthusiasts who would never do this to a prized vintage item, but for me I’d rather have them out on display where we can enjoy them more, instead of stashed in a drawer somewhere.
Let’s get started!

Materials:

  • 1/2 yard linen or base fabric for making the pillow cover
  • 1 vintage hankie (wash, iron, starch)
  • 1/2 yard heat n bond lite (available at Joanns, even pre-packaged at walmart)
  • thread, sewing machine, pins, etc.
I’ll give measurements for both a 16″ pillow form, but of course feel free to adjust these as needed for your particular hankie/pillow form.

Cutting the pieces:

  • top: 16″ x 16″
  • for envelope back: cut one piece 16″ tall by 14″ wide, and another 16″ tall by 11″ wide
Attaching hankie:
Apply heat n bond lite to the hankie using manufacturers directions.  Fuse hankie to pillow cover top, centering hankie.
The next step can be potentially tricky, but you’ll need to sew the hankie down to the pillow cover top as close to the hankie’s edge as possible.
Depending on how your particular hankie is shaped/hemmed, you might have to take it really slow and lift the presser foot and turn as you go.  You could alternately used heat n bond ultra (which requires no sewing to ensure the quality of the bond), however it will make the pillow more stiff, so I’ll just leave that up to you!
Finishing the pillow:
Next you’ll want to hem the edges of the envelope back opening.  Take one piece of envelope back and press the long side over by 1/2″ towards the WRONG side of the fabric and again by another 1/2″.
Sew close to folded edge.  Do this for both envelope back pieces.
Then place the pillow cover top facing RIGHT side up, on top of that layer the larger back piece RIGHT side down on top, aligning raw edges.  Then place the smaller envelope back piece over that, also RIGHT side down.  Pin.  Sew around entire perimeter using a 1/2″ seam allowance.
Serge or use a zig zag stitch around edges to finish them off so they don’t fray in the wash, clip corners.  Press.  Insert pillow form and enjoy!

geometric straw ornament tutorial

geometric straw ornament

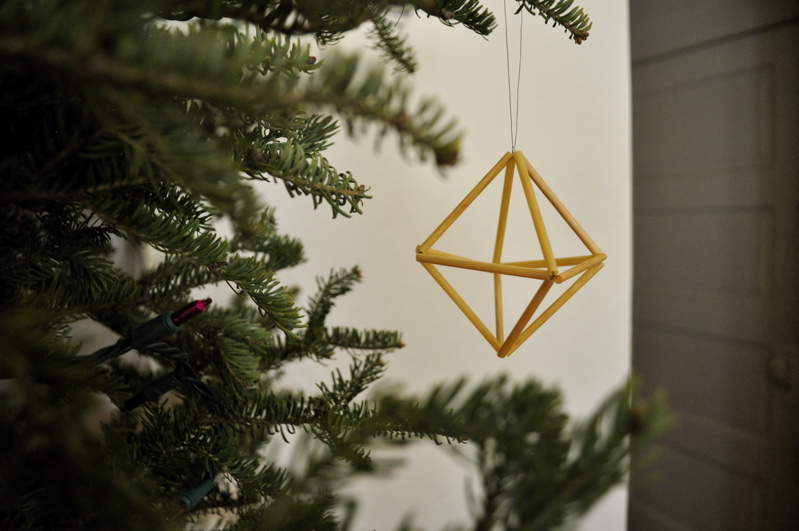
a lovely geometric straw ornament

This is a traditional eastern european ornament and garland. The shape is simple, but a little tricky the first time you make it. After you get the hang of it many three dimensional geometric shapes are possible. I think it makes for a nice modern, but still natural christmas ornament. Like the other tutorial I used straw for, this one can of course can be made with plastic or paper straws, but if you would like to use natural straws, I found mine the at the imagination childhood online shop.

materials for geometric straw ornament

materials

  • natural straw
  • button thread (or other strong thread)
  • yarn needle

directions

First you need to soak the straws and cut them into 2inch pieces. I explained this in detail in my tutorial for a straw and pompom garland.

1.Take a piece of thread about twice the length of your arm and thread the yarn needle–no need to knot it. String four straw pieces almost to the end of your thread. Pull the threads until the straws meet, but don’t pull too hard or you will split the straws. Then tie a square knot (that’s the plain old kind).  You can trim the end, but don’t cut the working thread.

2. Now pull the thread through two straw pieces and

3. secure them at the opposite end.

4. Thread two more pieces and tie at the top (the opposite end you just strung them from)

5. Take your needle back through one of the straws, so it comes out in the middle.

6. String one straw at a time securing it where the next straws meet. Do this four times and tie a knot.

Trim all your threads and decide which way you would like it to hang. Loop your thread at the top point and tie it together. Now hang up that nice looking ornament you just made.

geometric straw garland on a picture

You can keep going and make a double ornament, or keep going and going and make a whole garland! If you do, I would suggest making them one at a time and then tying them all together. Making these with a long piece of thread doesn’t really work: it gets tangled and it’s bothersome.

geometric straw garland on the tree

a christmas present for my lovely readers: a week of handmade ornament tutorials!

I will be accepting advertisers on Elsie Marley starting January 2011. If you would like to reserve a spot please email me and we can discuss the specifics! Thanks! elsiemarleyblog@gmail.com