wooden tangram tutorial
July 22nd, 2010
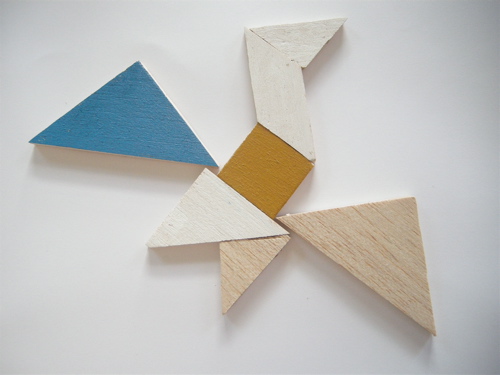
I’m sure you know what a tangram is but didn’t know it was called a tangram (when I looked it up, I think I might have typed, “that clever triangle-y puzzle thing”). If you’ve never even seen one, well then: it’s sort of a puzzle and sort of a game that involves five triangles, one square, and one parallelogram. The objective is to figure out how to make a given shape, which is shown only in silhouette, using the pieces and not overlapping any. My kids and I had a blast just playing around with the shapes and seeing what we could make. I thought you might like to make some too:
Materials:
- balsa wood (or sturdy cardboard, foam core, or actual wood wood, but you will need different tools for cutting the wood)
- a sharp pencil
- ruler
- exact-o knife
- fine grit sandpaper
- paint brush and paint (optional)
Directions:
1. Use an exact-o knife to cut the balsa wood into a 4 inch square. The piece of balsa wood I got at Michael’s Crafts was 4 inches wide already, so I only needed to cut it once to make a square.
2. Next you need to draw a 1 inch grid on the square very, very lightly. Draw a line one inch from the edge, then another one inch from that, one more and then turn the square 90 degrees and do it again. If you press down on the balsa wood at all it will make an indentation that won’t come out, so keep the pencil marks very, very faint.

3. Now we are going to draw 5 lines. I think it would be more confusing for me to explain where all the lines are drawn, so you can just follow the series of lines I drew above. Use the grid as a guide: draw through the corners, or on the lines, whichever is indicated by the picture. The first picture is the grid and the next five show the sequence of lines to draw.
4. Lightly erase the grid.
5. Take your exact-o knife and ruler and cut on the lines. Cut the shapes out in generally the same order you drew the lines. If you have a sharp blade it should take 3 or 4 passes along the line to cut through the balsa wood. It helps if you start a little above where you are cutting, instead of starting right on the line. Go slow and try to keep the blade perpendicular to the wood.

6. Lightly sand the pieces.
7. Paint (if you like). It’s nice to have both sides painted–especially the parallelogram–because it makes it easier to make more pictures with your tangrams, but I think they are equally beautiful not painted at all. It’s up to you.
You can even make a little cute box for your new tangram set to go in. The box I got was a little too small for the pieces to fit just right–oh well. Now go play: you can make animals, letters, quilts, cookies even and this book looks lovely too. Watch out though, you might get carried away:


Fab! We have a plastic travel set of these (yours are much nicer), but they do come with little cards as puzzles. They show you a silhouette shape on one side, with the solution of how to construct it on the other. I bet with a little Photoshop magic, you could make some from your pictures above and keep the kids busy for ages!
This is awesome!!!
I always wanted to know how people cut craft wood…thank you so much for showing me!
Thank you! What a fun project! I haven’t played with one in years…
Awesome! That store that sells oh so pretty paper and things makes colored cardboard that’s a little thinner than cardboard. I’m set to buy a piece and make a game for my husband, a former mathematician, as a de-stress game for the desk. Thanks!
What a great tutorial! I use these for homeschooling my kids and they love them!
I had a whole set of these when I was little from when my mom was little! I love this project!
We’re nuts about tangrams and similar shape puzzles over here. We’ve been really into Ed Emberley books and my almost 5 year old loves copying pictures and making his own shape pictures and books. I just make little books (paper, staples) and then put a shape on each page and he squirrels away with the books and goes to town.
This is such a wonderful toy! I can totally imagine putting magnets on both sides to use in the car. (can you tell I have a 9-hour drive ahead of me?)
[…] this to the (husband’s) crafty to-do […]
This is so cool! I remember tangrams from when I was younger. They were so much fun! Thanks tons for the great, giftable idea. I’ll be linking to this.
Fun!! What a great idea.
[…] of Elsie Marley shares a tutorial for making a tangram puzzle from balsa wood. I used to love playing with these when I was a kid, and I’m thinking I need […]
very nice!
When I was a teacher’s aide I had to make the silhouettes out of everyday pictures. I made close to a hundred of these tangram silhouettes in varying skill levels. I will try and scan them and add them to my blog within the next couple of weeks.
so cool–I’ll have to give this a go with the kids
[…] Tangram, puzzle My kids are puzzle doers – I’ll be making a few of these to store in the car or our “go away” bag for when we’re waiting in lines or in the store. They might actually sit still for 5 minutes. […]
Tangrams as art is brilliant!