Here it is, the string of lights advent calendar tutorial (and pattern!). I made the pdf pattern file all by myself for the first time, so if you have problems with it just email me and I’ll try to fix it. Otherwise, hurry up! because advent is almost over!

materials

green wool felt
multi-color felt scraps
60 feet green yarn
green embroidery thread
lightweight treats (gum balls, dum dums, love notes, tiny ornaments)

pattern

download here

directions

Cut the yarn into six equal pieces (10 feet each or 120 inches each or about 3 meters each). Take three pieces and braid them together. This is more difficult then it sounds, but if you roll up the slack and just work with a little yarn at a time it’s much easier. Braid the other three together the same way. Then twist the two braids together and knot the ends.  It will stay twisted when you sew the lights to it.

Cut out 25 (or 24 or however many lights you want) circles and rectangles. Create the socket by sewing a blanket stitch to the edge of rectangle and the circle attaching them to each other.  If the rectangle is slightly longer than the circumference of the circle clip it to fit and continue sewing the ends of the rectangle together. Sew the sockets onto the cord–one every three inches.

Cut out the light bulb pattern piece. To sew the lights up faster you can fold your colored felt over and simply trace the pattern onto it with a marker (permanent or not it doesn’t matter) then sew the two pieces together staying inside the lines.  To be safe test the first light to see if it fits: sew and turn out, put a treat or two inside, then fit it inside the socket and see if it stays when it’s hanging upside down. If it slips out, just make the lights slightly bigger.  If you’d rather use the lights for decoration and not for treats you can stuff the light bulbs lightly and sew them onto the socket.

I didn’t really finish the ends of the cord (I just tied a knot on both ends).  But it would be sweet to make a little plug out of felt to hide the knot. To do this cut out four extra “socket bottom” circles and two extra rectangles.  Cut a slit in the middle of one of the circles and insert your knot, then attach the rectangle, just like you did for all the sockets, and attach the other circle to the other side–making a  round (European style) plug. You can even make some prongs out of felt to complete the look.

download the pattern here.

snowmen

December 10th, 2008

Yesterday we were buried under almost a foot of snow, so we made meringue snowmen.  I had this little project stored somewhere in the back of my brain for a while and it was the perfect day for it. I whipped up some meringue, piped them onto a sheet pan, and the kids decorated them.  We didn’t have much (and there was no going to the store) so I cut raisins up for the eyes and we used the 10 red hots that were left. I didn’t want to use chocolate chips because I thought they would melt. But now I’m realizing I should have cut up some dried apricots for noses! oh well. I also forgot the peppermint extract, so they don’t really taste like much, but the kids don’t care at all. The meringue is sticky as all get out, so it’s a good idea to wet your fingers a little before you start decorating.

snowman meringues adapted from martha stewart

  • 3 large egg whites
  • 3/4 cup sugar
  • 1/2 teaspoon peppermint extract (or vanilla if you don’t have peppermint)
  • raisins, currants, dried fruit, red hots, or whatever else you have on hand for decorating

directions

  1. Put egg whites and sugar in the bowl of an electric mixer. Set bowl over a pan of simmering water, and stir until sugar has dissolved and mixture is warm to the touch, 2 to 3 minutes.
  2. Transfer bowl to an electric mixer fitted with the whisk attachment. Mix on medium-high speed until stiff peaks form.
  3. Mix in peppermint extract (don’t forget)
  4. Put the meringue into a piping bag with a large tip (or a ziploc bag with a clipped corner, or just use two spoons). If you have a silpat, use it. If not put some parchment paper on a cookie sheet and “glue” the corners down with a dab of meringue. Then pipe three adjoining circles–a snowman, silly.
  5. Decorate and pop in a 175 degree (Fahrenheit) oven for two hours. They will look exactly the same when you take them as they did when you put them in.

This is turning into a tutorial week! Tomorrow I’ll have the directions for the string of lights advent calendar and who knows maybe I can rustle up another tutorial for Friday (but don’t hold your breath). Also, a couple people have emailed me asking whether or not the mobile swap is happening again this year. And yes! it is. Sign up will start in January. Last year it was a big success! And I’ve even got an idea for my mobile already.

how to make english toffee

December 9th, 2008

This is my little bit for holidays at home.

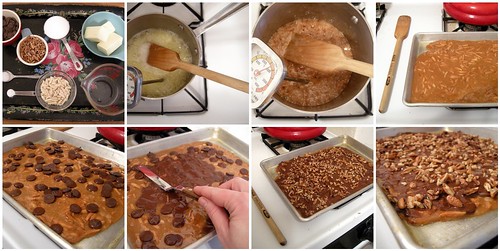
English toffee was the first christmas candy my mom made each year.  After we were done with all the Thanksgiving leftovers, she would make a huge batch and stick it all in the freezer. And I would spend the entire month of December sneaking pieces of it thinking no one would notice. I think probably half was gone by the time Christmas rolled around! So now I make english toffee every year for Christmas and though I still eat my fair share I try to give most of it away.  The recipe below makes a smallish batch–enough for a nice gift or your own personal use–but it is easily doubled or tripled.  Don’t be intimidated by the long (winded) directions, this toffee is easy and quick to make, I just wanted them to be extra clear.

ingredients
2/3 cup butter
1/2 cup sugar
1/3 cup water
1/2 tsp salt
2/3 cup blanched slivered almonds
1/4 tsp baking soda
1/2 cup chocolate chips or 2 small chocolate bars
1/2 cup chopped pecans

you will also need
saucepan
candy thermometer
cookie sheet  (I used a small one, but the size doesn’t really matter)
a silpat if you have one, extra butter if you don’t

directions

Before you jump right in, measure out all your ingredients so they are all ready to go. If you’ve never worked with boiling sugar before (or if you are prone to accidents) keep a small bowl of ice water next to the stove in case you burn yourself. Boiling sugar is super hot, so this isn’t one for the kids. If you have a silpat (and you really should get one–they are awesome) put in on your cookie sheet and you’re good to go. If not, butter your cookie sheet like crazy.

Now that everything is ready, put the sugar, butter, water and salt into your saucepan. Cook over medium heat, stirring occasionally, until it reaches 236 degrees Fahrenheit (soft ball) .  This will take a while and the chocolate chips are not there for you to snack on while you wait. The mixture will bubble up quite a bit.  It will stay around 200 degrees for longer than you think it should, but the temperature will shoot up quickly so don’t walk away. Make sure your candy thermometer is not resting on the bottom of the pan, but taking the temperature of the actual candy.

While you are waiting you can warm up the slivered almonds in the microwave. This will keep the candy’s temperature moving up instead of cooling down when you add them (but if you don’t have a microwave, you can skip it).

When the mixture is 236 degrees add the almonds. Stir constantly until it reaches 290 degrees (soft crack). The candy will turn a lovely amber shade and give off a nice, nutty smell. That when you know it’s done. I might have gone a tad too far with mine, but you’re not going to stop and take pictures while you cook.

Add the baking soda and stir.  Pour onto the prepared pan and spread it as best you can. Sprinkle the chocolate chips on top, wait a minute for them to melt and then spread them all over the top of the toffee. Sprinkle the chopped pecans on top of the chocolate and let cool.  You can speed up the cooling by popping the toffee in the freezer. When it’s completely cool break up into pieces and give away all that you don’t eat.

I made this half eaten gingerbread man last year, but I thought I’d post it again in case you are starting to freak out about how soon Christmas is (16 days). He’s super simple to sew up. I wrote up instructions and there is a pattern you can download too. If you’d like to see the other mutant gingerbread man I made click here and to know why I made them click here.

Plenty of you want a tutorial for the string of lights advent calendar, so look for that in a couple days. Now get off the computer and finish those christmas presents already.

and the winner is…

December 4th, 2008

Ingrid from lottielulu.blogspot.com!

Thank you everyone for playing along (all 250+ of you!).  If you’re peeved that you didn’t win you can hop on over to my shop and buy the little people bag pictured above. There will be more of these in the shop early next week.  You can subscribe to my etsy shop’s RSS feed so you always know when new things are available.

Thanks again! It was amusing hearing what everyone had for breakfast.  Turns out there are two camps: those who eat pastries for breakfast and those who eat leftovers from dinner last night.  And it turns out there are a whole hell of a lot of craft blogs out there. If you are new here I hope you’ll look around and I’ll try to work my way through the hundreds of blogs that are new to me!