Posts Tagged ‘tutorial’

from the north country: noodlehead

Hi there! It’s me, Anna from noodlehead.  If you have some time to kill today, feel free to stop by and say hi or check out my tutorials and patterns.  I also want to say a huge thanks to Meg for having me over.  I’ve been a long time admirer of Elsie Marley and am super honored that Meg asked me to stop by with a fun little project!

It’s a sweet and simple project you can create in time for valentines day.  This would even be a great project for a beginner or for a child who’s fairly comfortable using a sewing machine.

I thought of these pillows one day after I saw some of my vintage hankies.  Their colors were perfect for valentines day and I thought they would add a little bit of character to an empty chair or sofa.  My mom had given me a few of the hankies and I had collected a few from local estate sales.  If you’re not sure where to get vintage hankies, I suggest looking at estate sales, etsy, or ebay.  They’re usually in pretty good condition and will be durable enough to add to a pillow  After all, they were originally intended for nose blowing!
Now I’m sure there are some enthusiasts who would never do this to a prized vintage item, but for me I’d rather have them out on display where we can enjoy them more, instead of stashed in a drawer somewhere.
Let’s get started!

Materials:

  • 1/2 yard linen or base fabric for making the pillow cover
  • 1 vintage hankie (wash, iron, starch)
  • 1/2 yard heat n bond lite (available at Joanns, even pre-packaged at walmart)
  • thread, sewing machine, pins, etc.
I’ll give measurements for both a 16″ pillow form, but of course feel free to adjust these as needed for your particular hankie/pillow form.

Cutting the pieces:

  • top: 16″ x 16″
  • for envelope back: cut one piece 16″ tall by 14″ wide, and another 16″ tall by 11″ wide
Attaching hankie:
Apply heat n bond lite to the hankie using manufacturers directions.  Fuse hankie to pillow cover top, centering hankie.
The next step can be potentially tricky, but you’ll need to sew the hankie down to the pillow cover top as close to the hankie’s edge as possible.
Depending on how your particular hankie is shaped/hemmed, you might have to take it really slow and lift the presser foot and turn as you go.  You could alternately used heat n bond ultra (which requires no sewing to ensure the quality of the bond), however it will make the pillow more stiff, so I’ll just leave that up to you!
Finishing the pillow:
Next you’ll want to hem the edges of the envelope back opening.  Take one piece of envelope back and press the long side over by 1/2″ towards the WRONG side of the fabric and again by another 1/2″.
Sew close to folded edge.  Do this for both envelope back pieces.
Then place the pillow cover top facing RIGHT side up, on top of that layer the larger back piece RIGHT side down on top, aligning raw edges.  Then place the smaller envelope back piece over that, also RIGHT side down.  Pin.  Sew around entire perimeter using a 1/2″ seam allowance.
Serge or use a zig zag stitch around edges to finish them off so they don’t fray in the wash, clip corners.  Press.  Insert pillow form and enjoy!

paper christmas tree ornament tutorial

paper christmas ornaments

a paper christmas tree ornament

This as simple as it gets. A few scraps of paper, one seam and in minutes you’ve make a pretty, handmade ornament. I used paint chips (in lovely martha stewart colors) from the hardware store because I had them on hand, but cardstock or thin cardboard or old christmas cards would all work well.

an ornament from paint chips

Cut out one star and three to five strips of paper.  If you’d like to use the same measurements I used, you can download the pattern pictured below. If you would rather do it freehand, cut progressively longer strips for the tree, as wide as you like, and cut a good size trunk.

paper tree pattern

You are going to sew a seam down the middle of everything on your sewing machine. Sewing on paper is really not that much different than sewing on fabric, except that you use a slightly longer stitch and it’s ok to use a dull needle. If you are anything like me, there is one in your machine right now! Make a bunch of paper tree ornaments with that perfectly dull specimen and then do yourself a favor: take it out! And get a nice, new sharp one in there for the rest of your christmas sewing.

First make sure you have about three inches of slack from the bobbin and past the needle before you begin sewing. Then place the star under the presser foot of your machine take one stitch forward and then one stitch back (a little sewing dance!) to secure the thread and then sew down the middle of the star. Before you get to the bottom nudge the shortest strip of paper under the presser foot and sew down the middle of it.  And so on, with the rest of the strips and the trunk.

sewing paper trees

When you get to the bottom of the trunk, sew back and forth a few times to secure the thread again. Tie the ends on top of the ornament together, so it makes a loop for hanging. Snip the thread ends on the bottom of the trunk and you’re done!

christmas tree ornament made out of paint chips

variations

I included a pattern for a snowman in the PDF pattern as well, but a million other things are possible: candy canes, bells, santas, pretty much anything you can think of to cut out and sew together!

snowman ornament made from paint chips

a christmas present for my lovely readers: a week of handmade ornament tutorials!

I will be accepting advertisers  on Elsie Marley starting January 2011. If you would like to reserve a spot please email me and we can discuss the specifics! Thanks! elsiemarleyblog@gmail.com

straw and pompom garland tutorial

the straw and pompom garland hanging on a mirror

a straw and pompom garland

I ordered a bunch of natural straws from the lovely online shop, Imagination Childhood (they call them swedish straws). I bought them for another project (thursday’s tutorial!), but I loved working with them so much I wanted to make a simple garland with them too. Obviously this can be done with plastic straws or even some pretty paper straws, if you don’t have any swedish straws lying around. But the natural straws are, well, natural and because of the they are curved slightly and the colors are mottled and the surface uneven, all of which makes them pretty beautiful.

materials

materials for make a pompom and straw garland

To make this garland I paired the natural color of the straw with cream colored yarn, which is a little on the understated side (for me). I think bright, almost neon, pompoms in christmas light colors would look pretty fantstic too.

  • natural straws
  • bowl or pan in which the straws can lie flat
  • yarn
  • button thread (or any heavy duty thread)
  • yarn needle

directions

First you have to make some pompoms. If you have a pompom maker you are good to go, if you don’t that’s fine too–just use this simple tutorial over at Bella Dia for making pompoms using only your fingers. You can, of course use the little store bought pompoms too.

making pompoms

While you are making your pompoms put the natural straws in some very hot water to soak. This makes the straw less brittle and less likely to split when you cut them. They should sit about an hour–enough time to make a bunch of pompoms. When you are ready to use them, take them out from the water, drain and wipe them off gently.

soaking the straws

To cut the straws, make a mark on one straw every two inches. If your yarn needle is shorter than two inches, make your straws a little shorter too–this will make things a little easier when you make the garland. Then take about 5 or 6 straws, including the one you marked, in your hand and line them up. Then cut. Some might go flying, but if they are still a little damp they shouldn’t go too far.

cutting natural straws

Now take a long piece of thread, knot it, and stick it through a pompom. It might take a few tries before you find the right spot where the knot doesn’t go right through. Then alternate pompom, straw, pompom, straw. Finish with a pompom and hide the knot in the yarn. If you want to keep going but ran out of thread, ready another needle and thread (knotted) and insert the need where the last straw and pompom meet, then just keep going.

pompom garland on the tree

variations

Pretty paper stars also look nice between the natural straws. Popcorn might work, dried orange slices would look nice.  And I bet you can think of a bunch of other things too.

a christmas present for my lovely readers: a week of handmade ornament tutorials!

I will be accepting advertisers  on Elsie Marley starting January 2011. If you are interested in reserving a spot please email me and we can discuss the specifics! Thanks! elsiemarleyblog@gmail.com

wooden tangram tutorial

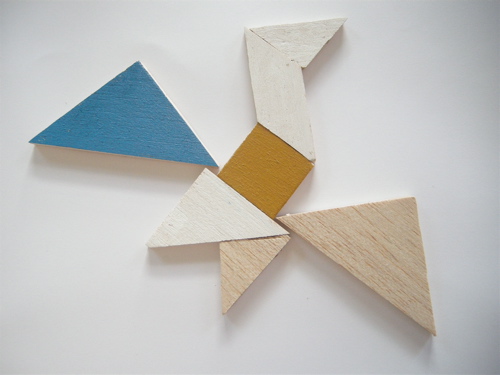
I’m sure you know what a tangram is but didn’t know it was called a tangram (when I looked it up, I think I might have typed, “that clever triangle-y puzzle thing”). If you’ve never even seen one, well then: it’s sort of a puzzle and sort of a game that involves five triangles, one square, and one parallelogram.  The objective is to figure out how to make a given shape, which is shown only in silhouette, using the pieces and not overlapping any.  My kids and I had a blast just playing around with the shapes and seeing what we could make. I thought you might like to make some too:

Materials:

  • balsa wood (or sturdy cardboard, foam core, or actual wood wood, but you will need different tools for cutting the wood)
  • a sharp pencil
  • ruler
  • exact-o knife
  • fine grit sandpaper
  • paint brush and paint (optional)

Directions:

1. Use an exact-o knife to cut the balsa wood into a 4 inch square.  The piece of balsa wood I got at Michael’s Crafts was 4 inches wide already, so I only needed to cut it once to make a square.

2. Next you need to draw a 1 inch grid on the square very, very lightly. Draw a line one inch from the edge, then another one inch from that, one more and then turn the square 90 degrees and do it again. If you press down on the balsa wood at all it will make an indentation that won’t come out, so keep the pencil marks very, very faint.

3. Now we are going to draw 5 lines. I think it would be more confusing for me to explain where all the lines are drawn, so you can just follow the series of lines I drew above. Use the grid as a guide: draw through the corners, or on the lines, whichever is indicated by the picture. The first picture is the grid and the next five show the sequence of lines to draw.
4. Lightly erase the grid.
5. Take your exact-o knife and ruler and cut on the lines. Cut the shapes out in generally the same order you drew the lines. If you have a sharp blade it should take 3 or 4 passes along the line to cut through the balsa wood. It helps if you start a little above where you are cutting, instead of starting right on the line. Go slow and try to keep the blade perpendicular to the wood.

6. Lightly sand the pieces.

7. Paint (if you like). It’s nice to have both sides painted–especially the parallelogram–because it makes it easier to make more pictures with your tangrams, but I think they are equally beautiful not painted at all.  It’s up to you.

You can even make a little cute box for your new tangram set to go in. The box I got was a little too small for the pieces to fit just right–oh well.  Now go play: you can make animals, letters, quiltscookies even and this book looks lovely too. Watch out though, you might get carried away:

the quick little bunny tutorial

quickbunny

I really wanted to make the sock bunny that Heidi (from My Paper Crane) created, but I didn’t have any of those fantastic red and brown monkey socks. What I do have is baby socks: tons of cute, mismatched, totally useless, never stay on baby socks. Now that my littlest is very much not an infant and too soon will be a toddler it seems kind of silly to keep all those teeny tiny socks. So I made a bunny out of them. And a tutorial too.

DSCN1529 DSCN1537

This is indeed a quick little bunny. After I figured out the pattern, start to finish each bunny took me just 15 minutes.  So if you are anything like me and never get around to the easter baskets until the night before, you can whip up this little softie and still have time to run to the drugstore to score the last bag of jelly beans.

The quick little bunny tutorial

DSCN1486

Materials:

  • baby sock
  • a handful of stuffing
  • heavy duty thread
  • scissors

Make that bunny:

Before you start sewing take second to look at the sock you have. Most of the foot part will be the body and the heel area will be the head. Yours might be a little different, depending on your sock. If you look at the picture below you can almost see the bunny already.

DSCN1495

the body:

Take some stuffing and stuff the foot part of the sock–not too tight! this is just a little, squishy baby bunny. Where the foot part ends and the heal begins sew a running stitch around the sock and pull to gather it. I like to wrap my thread around where I’ve stitched a few times just so it’s secure. Knot your thread and snip.

the tail:

DSCN1498

On the top of the bunny’s back,  sew a circle about an inch in diameter with a simple running stitch. Then pull to gather. You may have to mush the stuffing around so you can pull it tight  to make a tail shape. When you have a little bunny tail, wrap your thread around a few times and knot off (do people say “knot off?” does it sound too much like I’m yelling at you to go “knot off!”).

the head:

DSCN1504

To make the head, put a little stuffing inside the sock and sew a running stitch around the top of the heel. Before you pull it taut make sure all the stuffing is pushed down under your stitches. Then wrap the thread around and knot off!

the ears:

DSCN1508

Cut a big V shape out of the top of the sock. Now trim the top part of each ear to a point.  Then fold the two sides of the bottom part of one ear in to meet and sew together. This is a little easier to understand when you look at a picture:

DSCN1509 DSCN1511

When you sew that seam down the middle of the ear, it’s good to catch some of the back of the ear with your stitches, so the ears are a little thinner.

The attitude:

Okay, that is a dorky title, but this is the fun part. Now you can play around with the ears and the head, moving them to where you want and putting a stitch here and a stitch there so they will stay.

DSCN1515

You don’t have to give your bunny an attitude, but you should stitch the back of the head to the body a little, so it looks more bunny like and less like a cinched up sock. There! you did it! Now go dig around in the sock drawer and see what else you can make into a bunny.

DSCN1538